Abstract
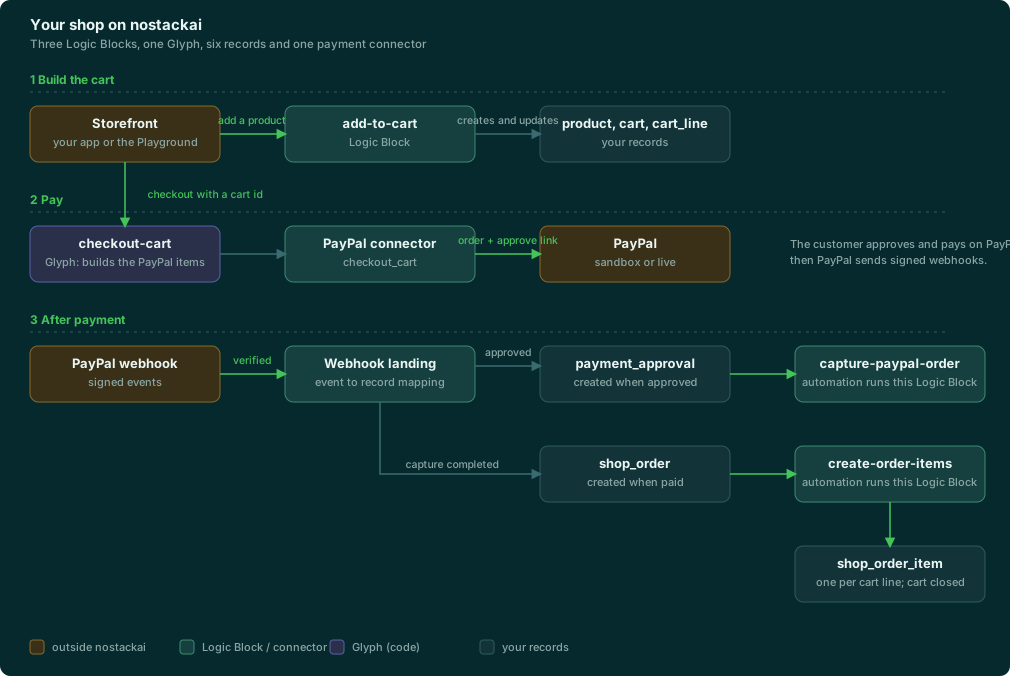
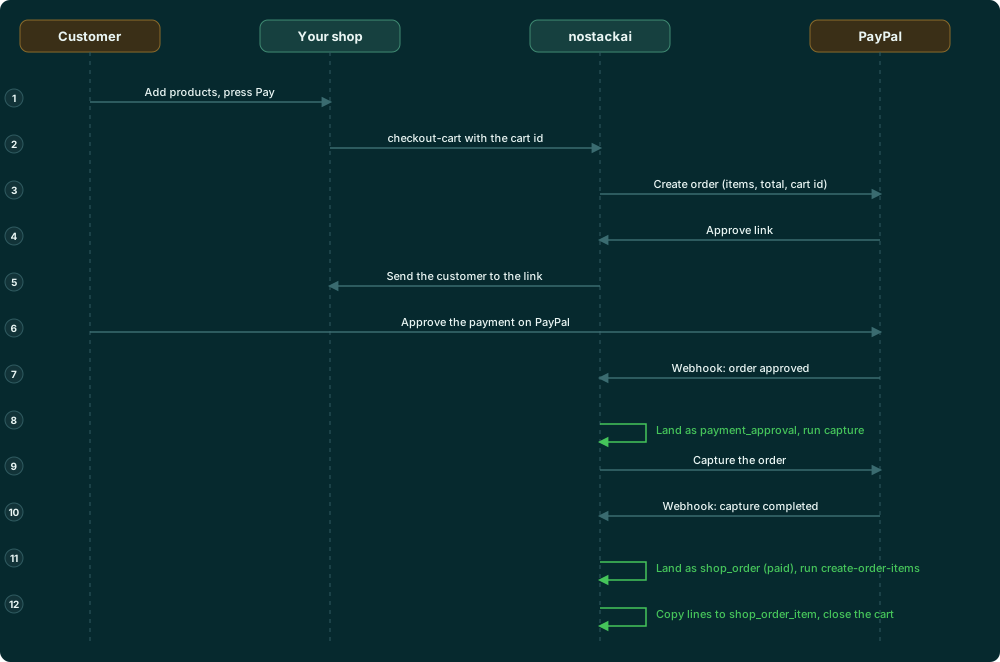
A shop needs five things: products, a cart that people add to, a checkout that takes money, a record that the money arrived, and an order that lists what was bought. This case study builds all five on nostackai with no servers of your own. A cart is built by a Logic Block. A short Glyph starts a PayPal checkout from that cart. PayPal's own notifications, called webhooks, create the paid order, and an automation copies the cart's lines onto the order as order items.
You will create six records, three Logic Blocks, two automations and one Glyph, set up the PayPal connector once, and test every step from the Playground. Everything except the Glyph imports from a single file. The screens are from a real run in a fresh organization, in PayPal's sandbox, so no real money moves.
Who this is for
Anyone who wants to run online sales on nostackai: a developer building a storefront, an agency delivering one, or a founder deciding whether the platform covers checkout. You do not need to write code to follow along; the one Glyph is ten lines of Python you paste.
What you need
- A nostackai organization with one tenant, and org-admin access to its console.
- A PayPal developer account with a Merchant sandbox app and a Personal sandbox buyer account. Payment connectors walks through creating both.
- The organization's Allowed Domains must include the site that will call your app (here, the Playground), and the PayPal API domains the connector card lists.
- About 45 minutes.
The scenario and what it must do
A small outdoor-gear shop, Trailhead Outfitters, sells three products. A customer adds products to a cart, can add more of the same one, and pays once for the whole cart. When the payment is complete the shop must have an order that says what was paid, when and how much, one order item for each line of the cart, and a cart that is closed so it cannot be paid twice.
| Requirement | How it is met |
|---|---|
| Customers add products and change quantities | The add-to-cart Logic Block opens a cart, adds lines, and recomputes the totals from the lines |
| One payment for the whole cart | A Glyph builds the PayPal items from the cart's own lines and starts a PayPal cart checkout |
| Prices cannot be changed by the customer | The checkout takes only a cart id; items and total are built on the server |
| Know when it is paid | PayPal's webhooks land as records in your own data |
| An order and its items | An automation on the new order copies the cart lines into order items and closes the cart |
The data model
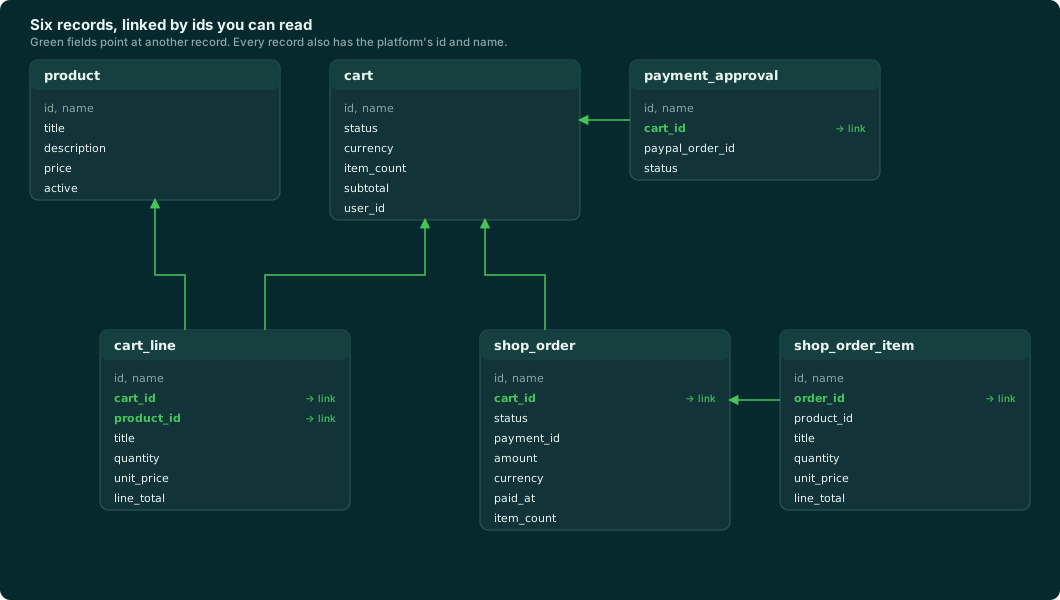
Six records hold the whole shop. They are ordinary entities you define once; nothing about them is built into the platform, so you can add fields (a shipping address, a coupon) the same way.
| Record | Holds | Created by |
|---|---|---|
| product | What you sell: title, description, price, active | You (or an import) |
| cart | A shopper's open basket: status, currency, item count, subtotal, owner | add-to-cart |
| cart_line | One product in a cart: quantity, the unit price at the time, the line total | add-to-cart |
| payment_approval | PayPal reported the customer approved: the PayPal order id and a status | PayPal's approved webhook |
| shop_order | A paid order: amount, currency, PayPal payment id, paid time, item count | PayPal's completed webhook |
| shop_order_item | One row per cart line, copied onto the order | create-order-items |
The price is copied onto the line
A cart line stores the unit price when the product is added. Changing a product's price later does not change carts that already hold it, and the checkout charges what the customer saw.
What you will create
| Asset | Kind | What it does |
|---|---|---|
| add-to-cart | Logic Block | Adds a product to a cart, opening one if no cart id is given, and returns the cart id, the cart and its lines |
| checkout-cart | Glyph (code) | Reads the cart and its lines, builds the PayPal items, adds up the total, starts the checkout and returns the PayPal link |
| capture-paypal-order | Logic Block | Captures the approved PayPal order (this is when the money moves) and marks the approval and the cart |
| create-order-items | Logic Block | Copies each cart line onto the order and marks the cart ordered |
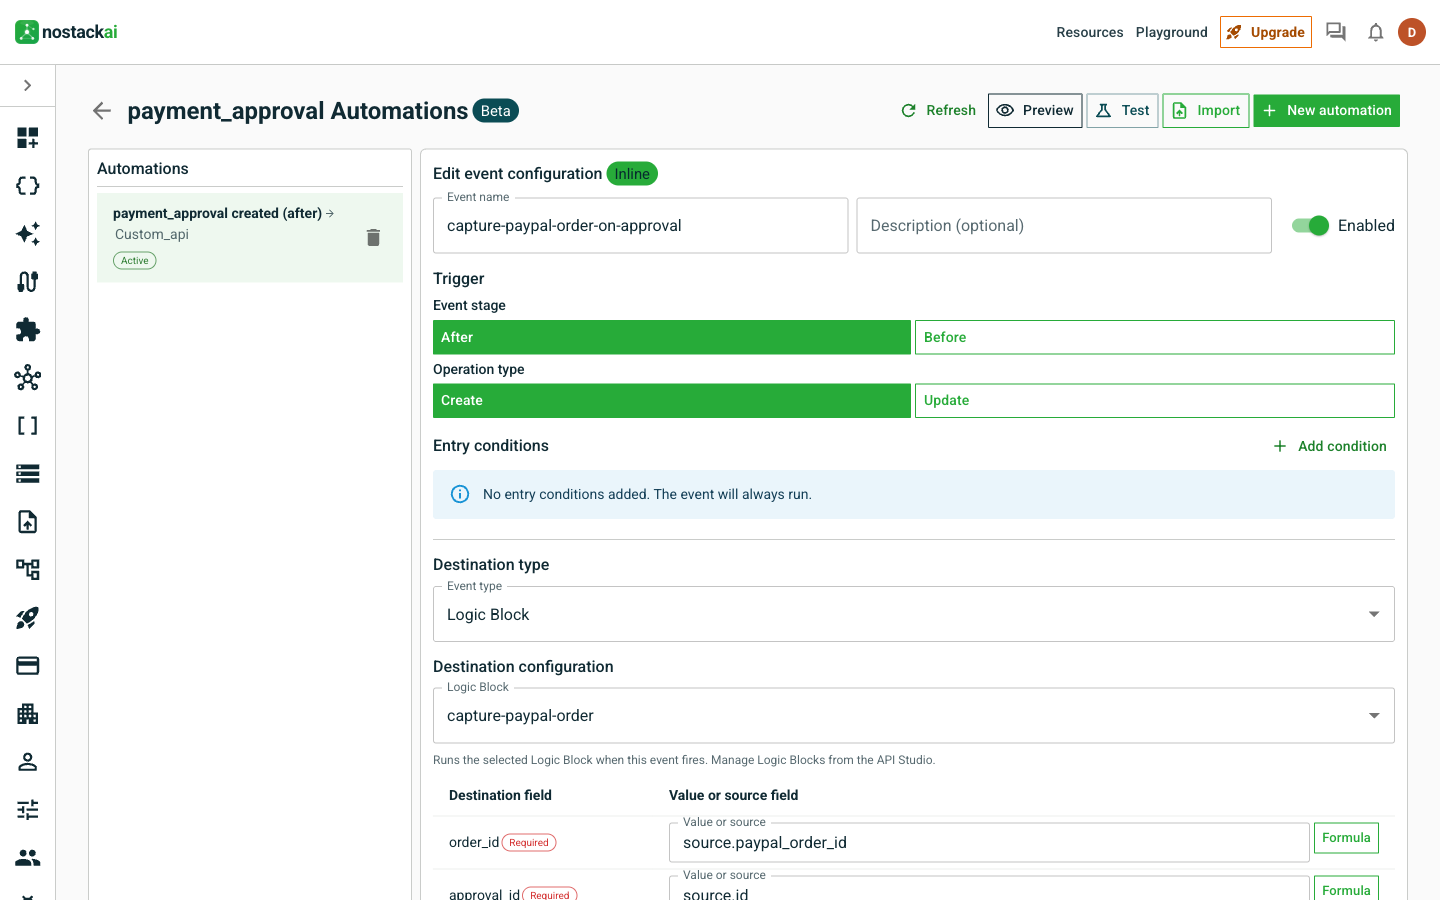
| capture-paypal-order-on-approval | Automation | When a payment_approval record is created, runs the capture |
| create-order-items-on-order | Automation | When a shop_order record is created, runs create-order-items |
| PayPal connector | Organization and tenant settings | Adopted once for the org; each tenant adds its own credentials, redirect pages and webhook |
| Webhook landing | Connector setting | Says which record each PayPal event creates or updates |
Part A · Set up the PayPal connector
This is configuration, once per organization and once per tenant. The full PayPal-side walkthrough is in Payment connectors; this is what you do in nostackai.
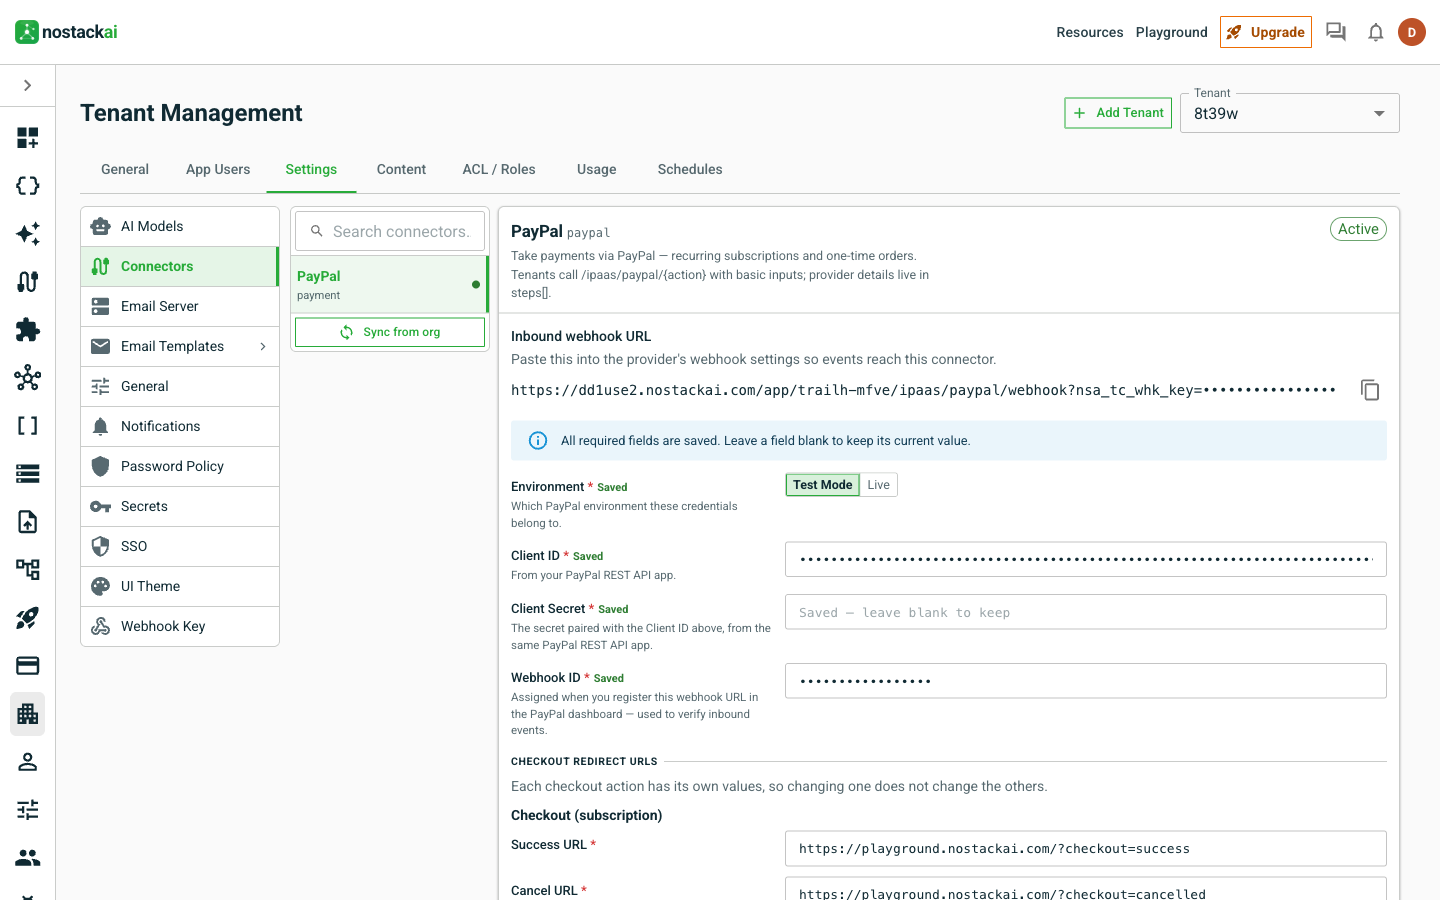
CHECKOUT.ORDER.APPROVED, PAYMENT.CAPTURE.COMPLETED and PAYMENT.CAPTURE.DENIED, then paste the Webhook ID PayPal gives you back here.https://; PayPal rejects an address without one. These are where PayPal sends the customer back to.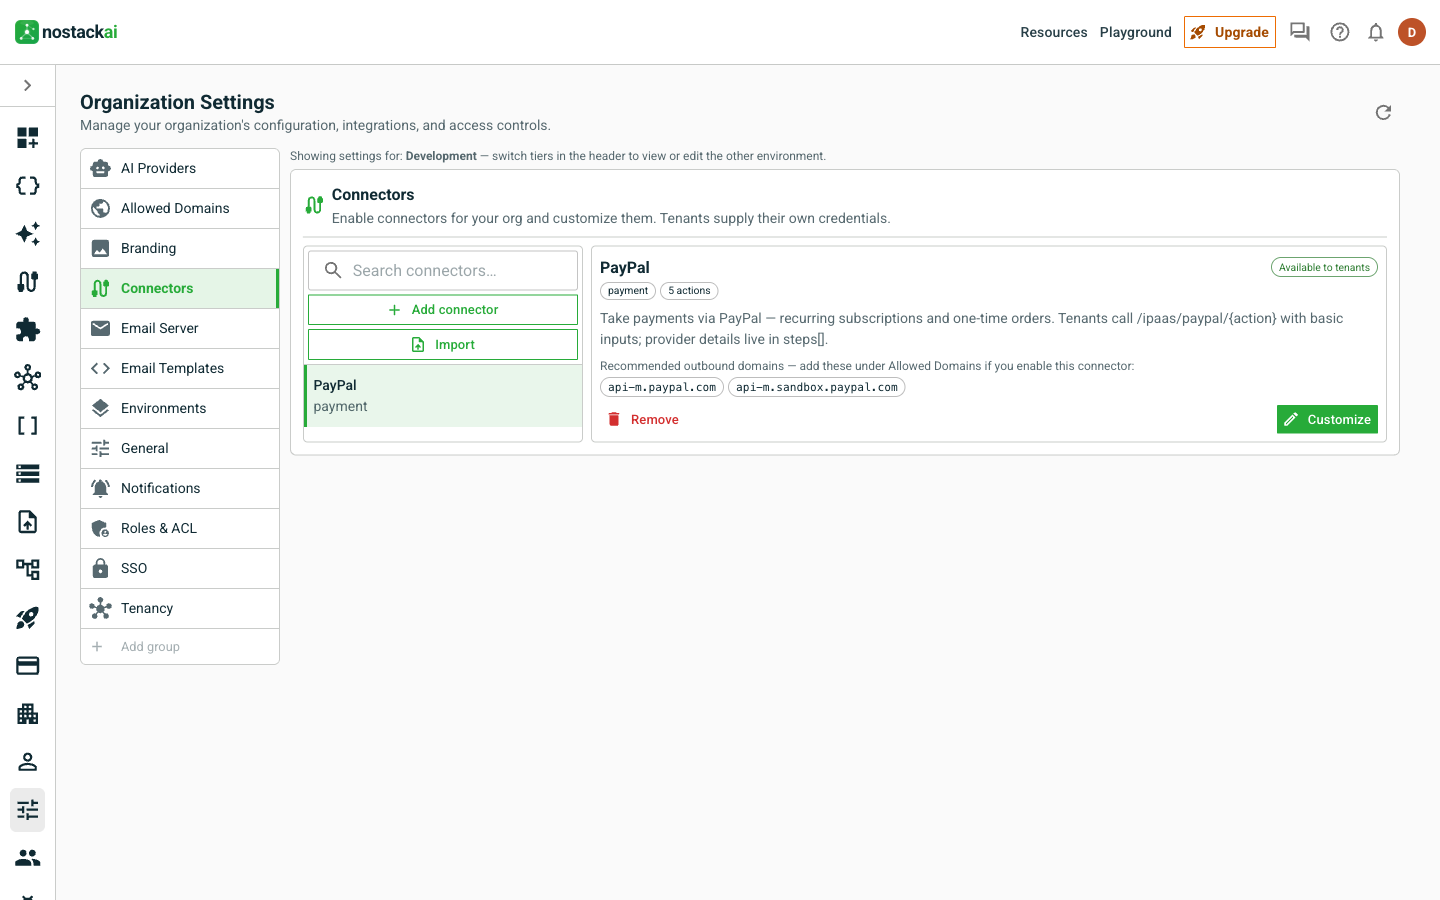
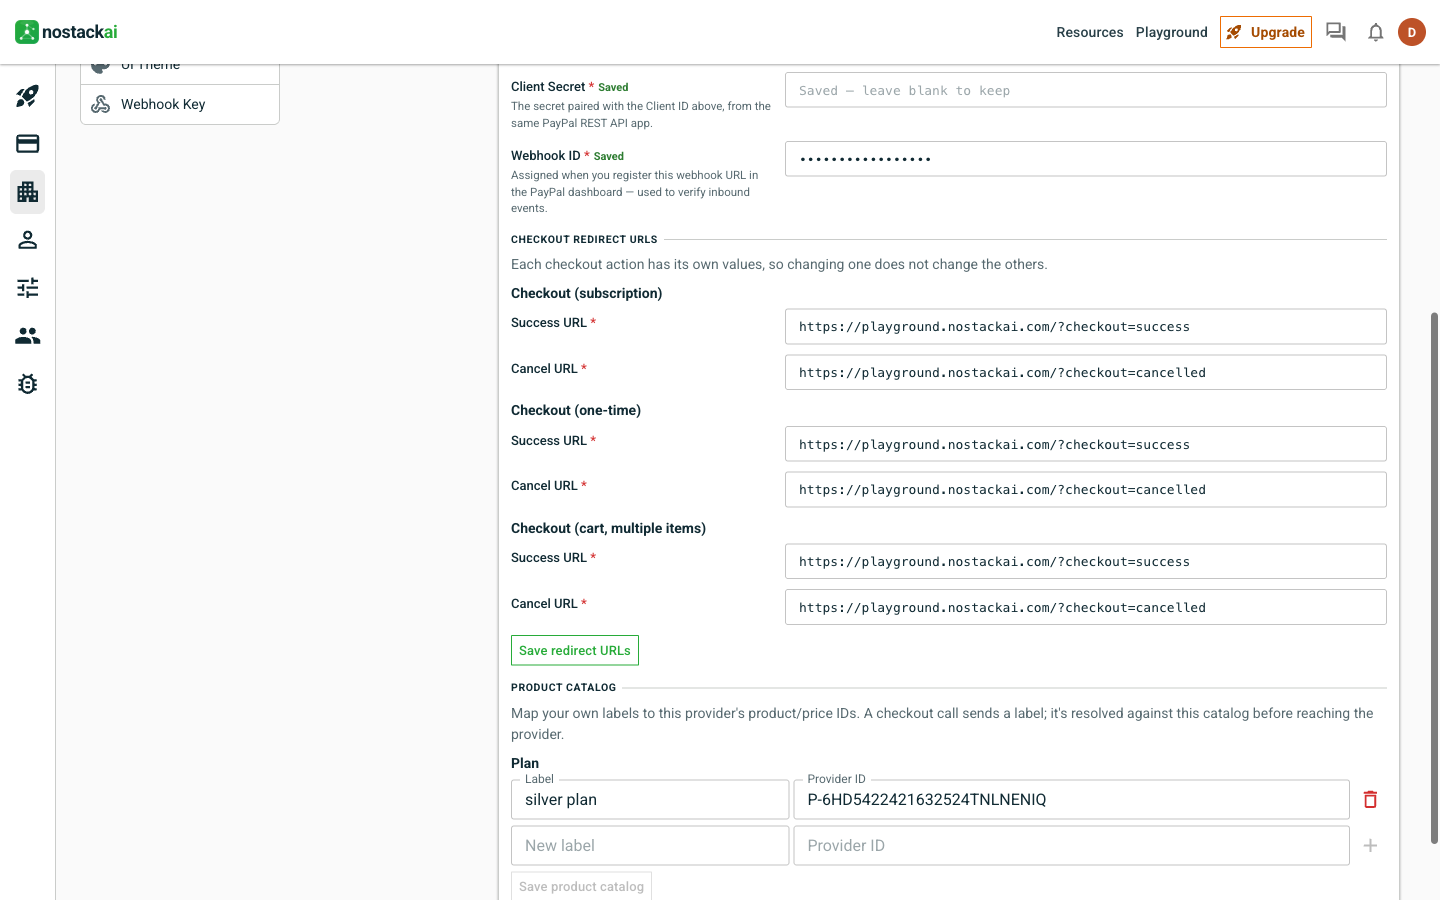
Credentials stay with the tenant
The client secret is stored encrypted for the tenant and is never shown again after saving. The screens in this case study mask the identifiers; use your own values.
Part B · Import the shop
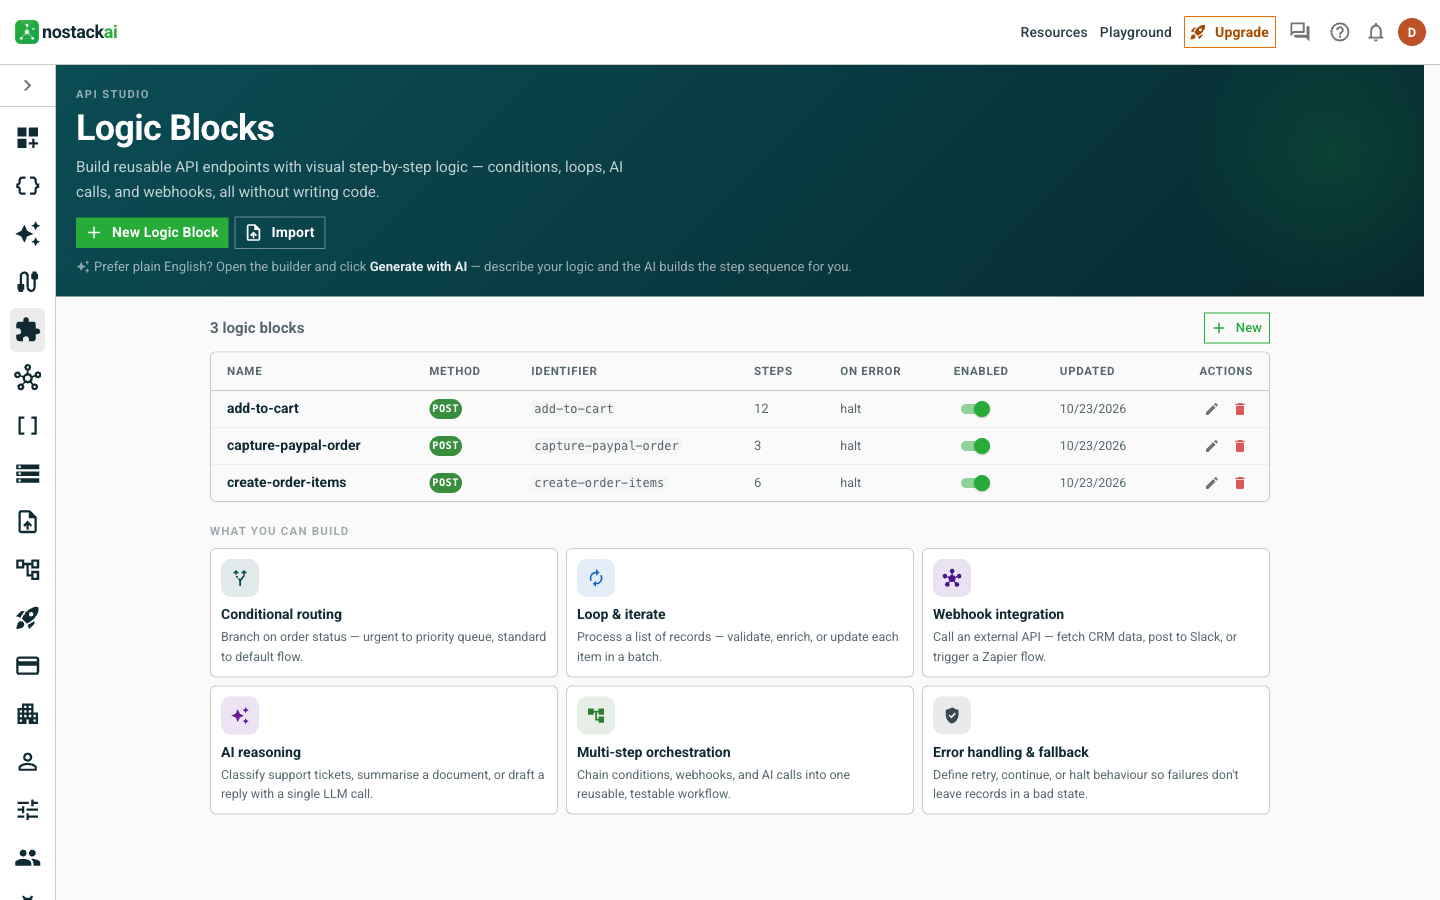
The six records, three Logic Blocks and two automations are one file. Download [shop-bundle.json](/casestudies/ecommerce/shop-bundle.json), then in the console open Import Metadata, choose the file and review the preview. Every item is checked against your organization before anything is created, and a name that already exists is refused rather than overwritten.
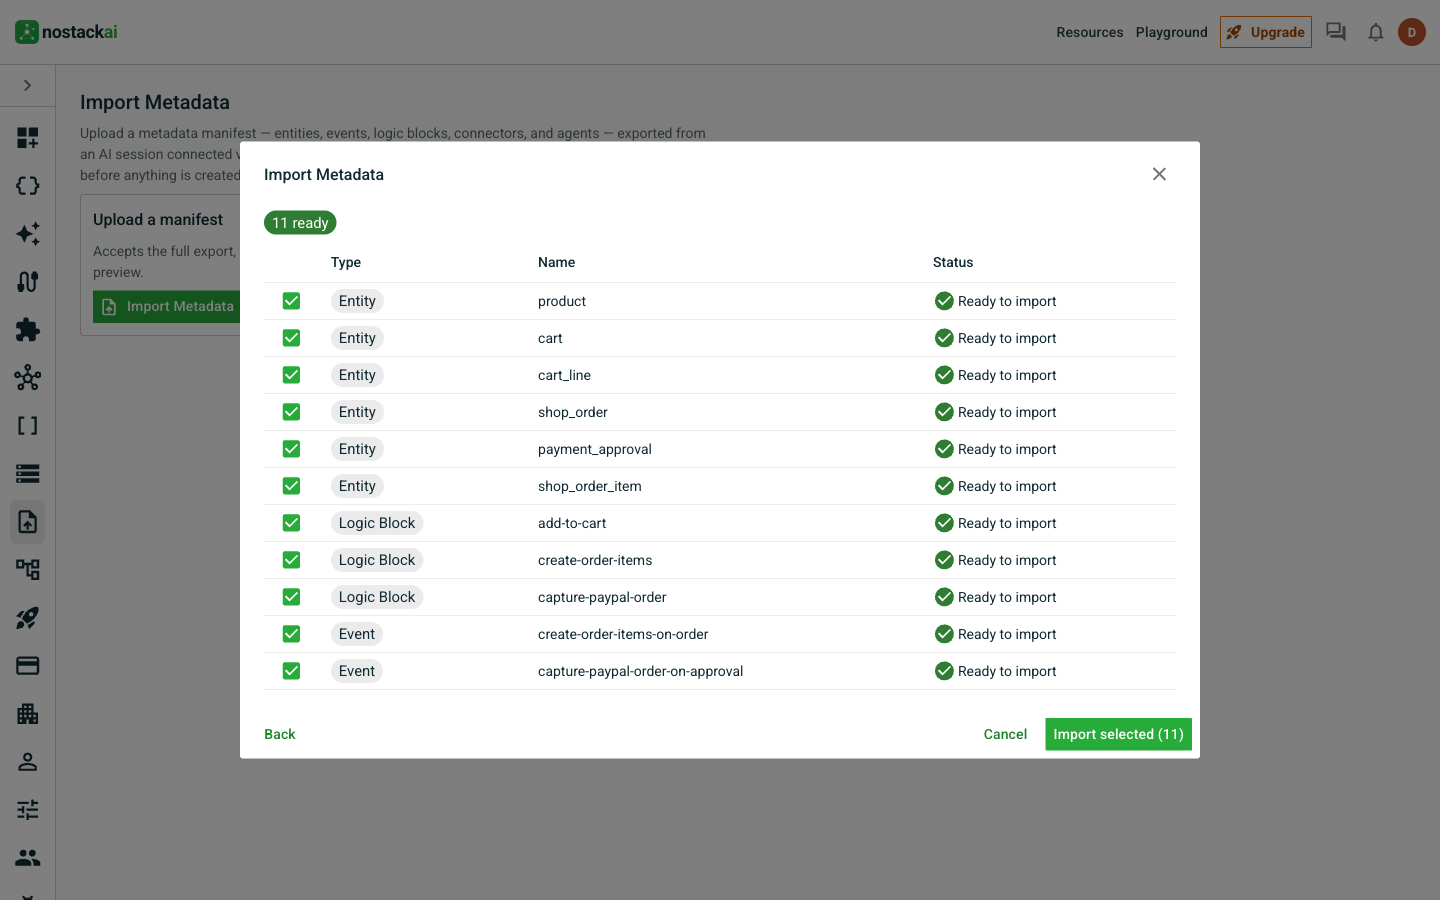
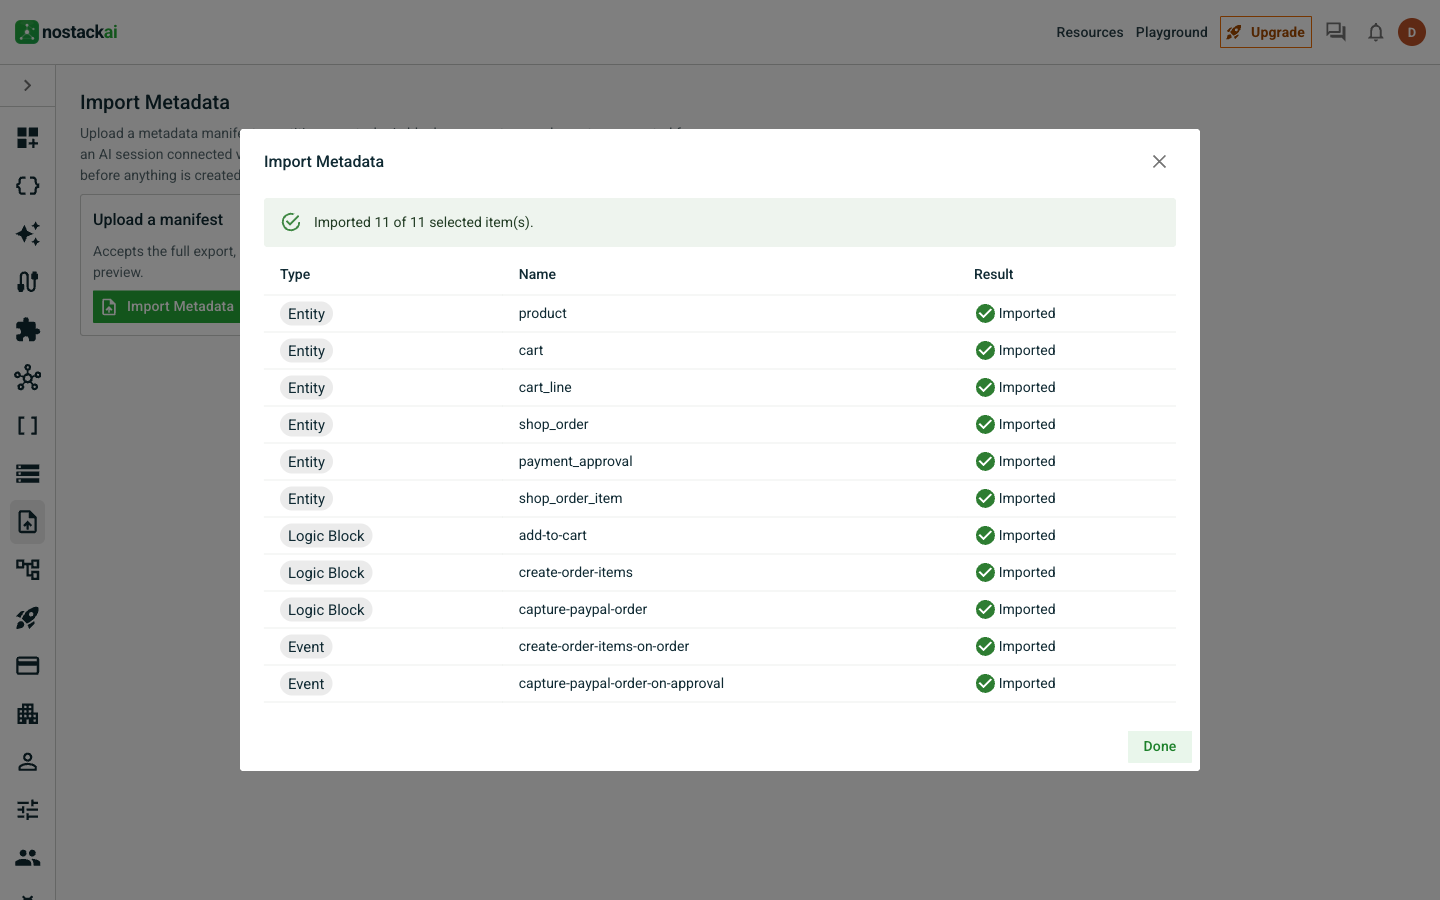
Choose Import selected. All eleven items are created.
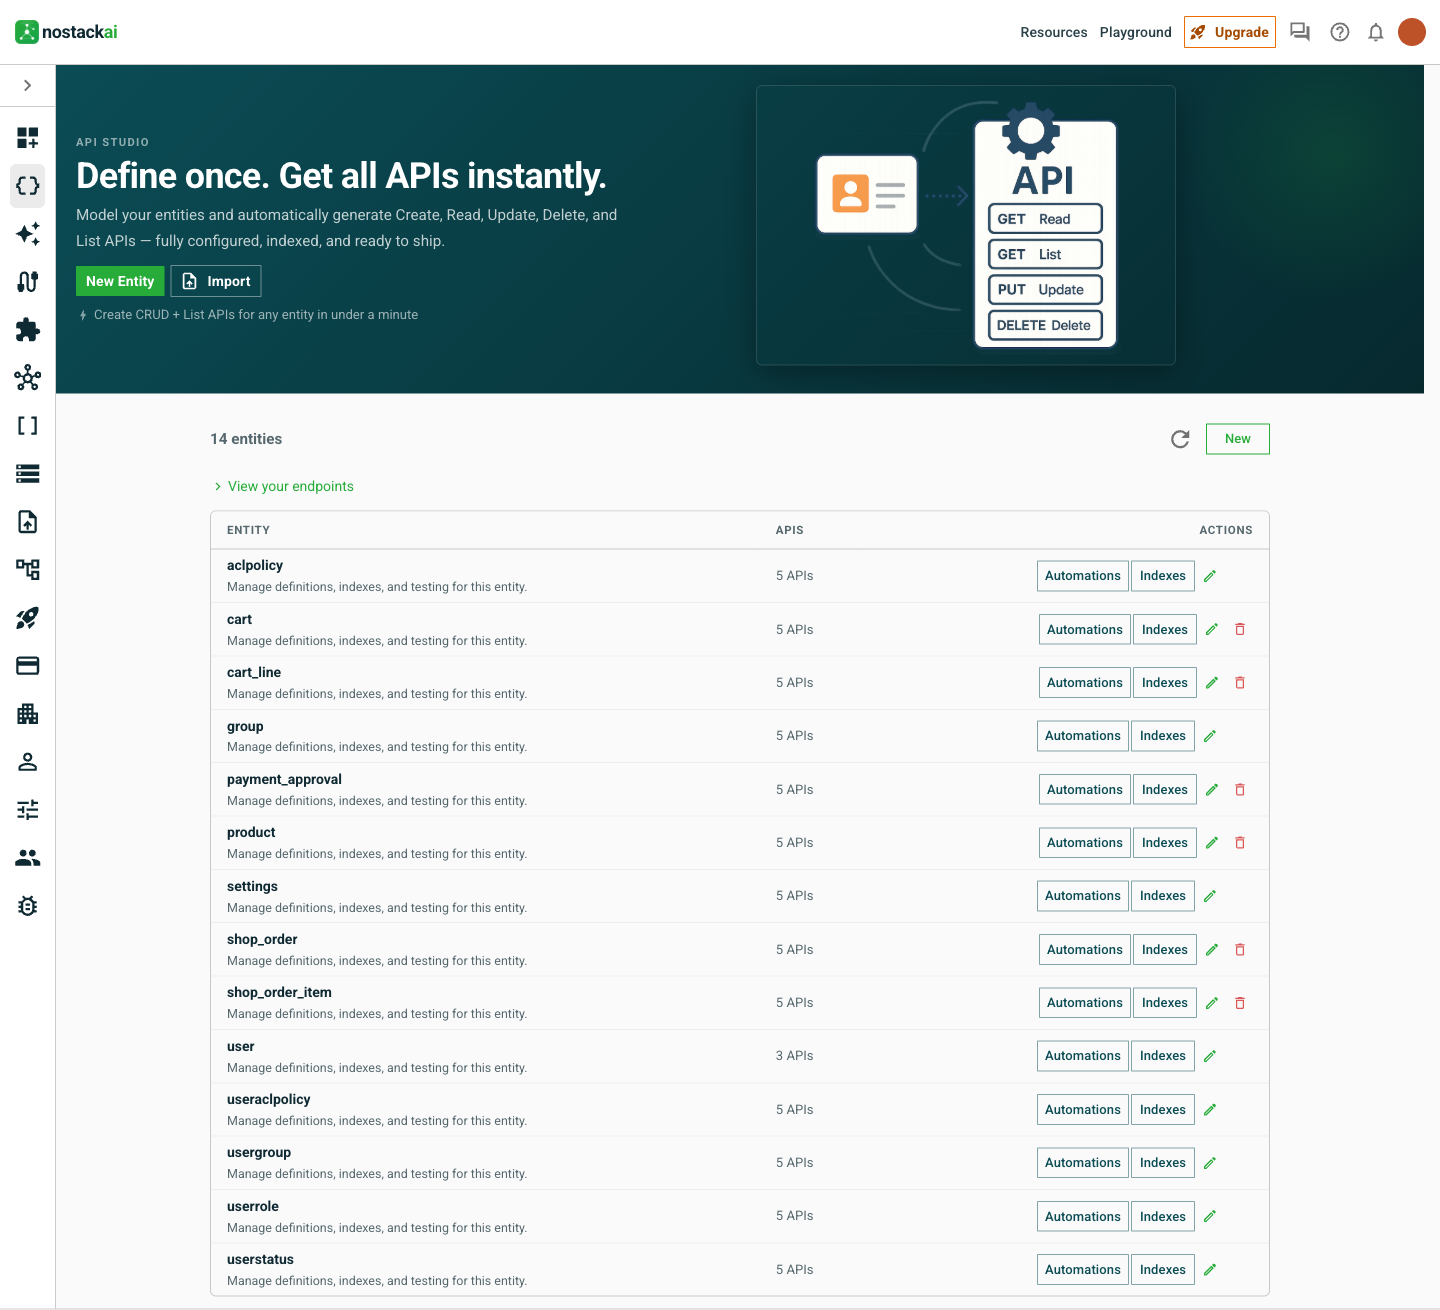
The records now appear in API Studio and the Logic Blocks in the Logic Blocks list.
Prefer to build it by hand?
Each asset is listed with its fields and steps in E-commerce assets reference. The import and the hand-built version are identical.
Part C · The assets, one by one
Add to cart
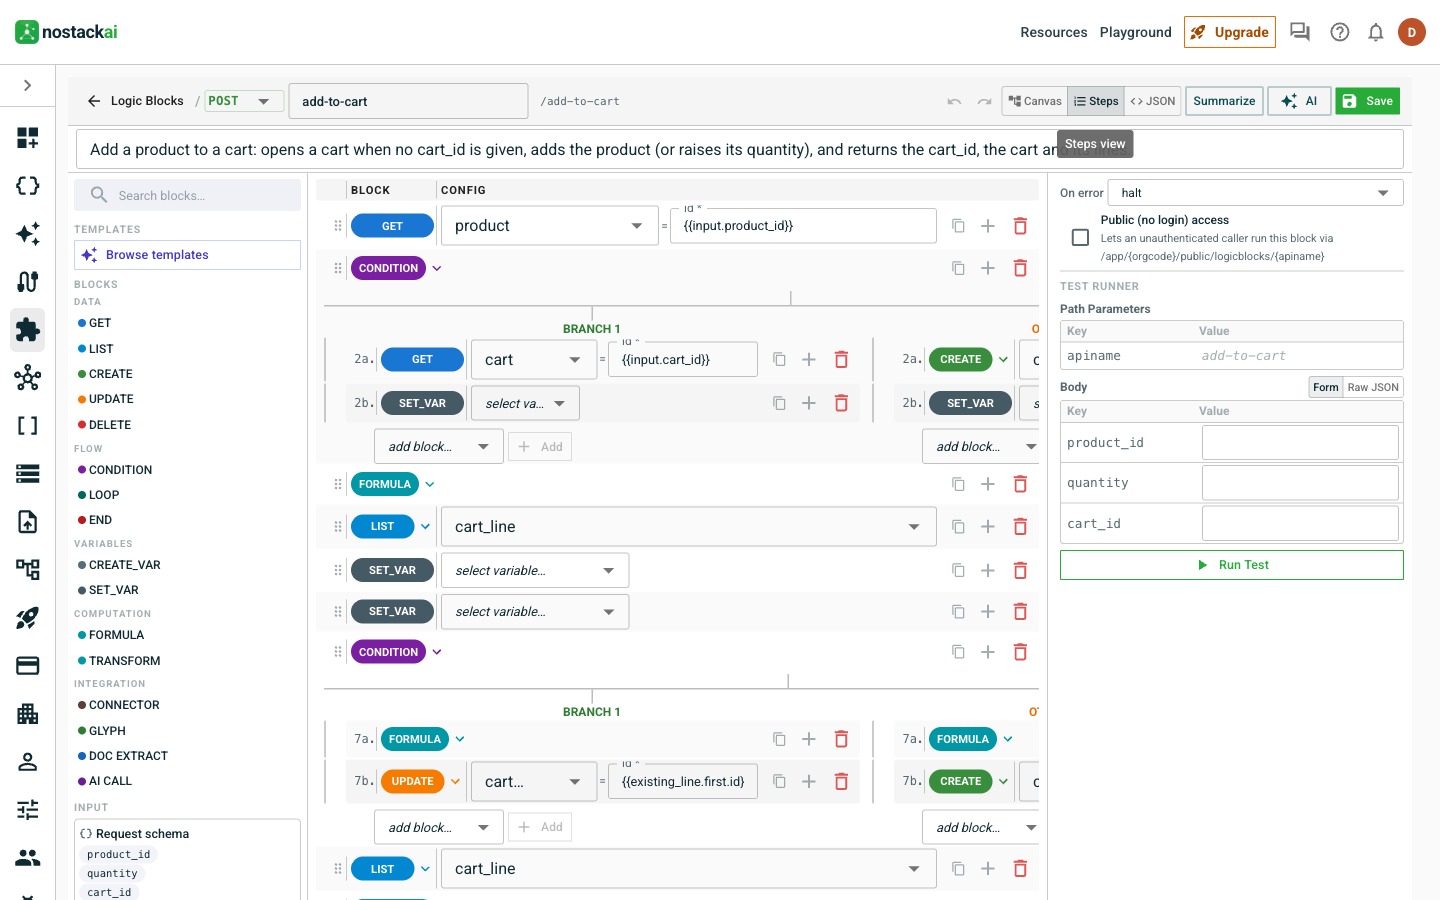
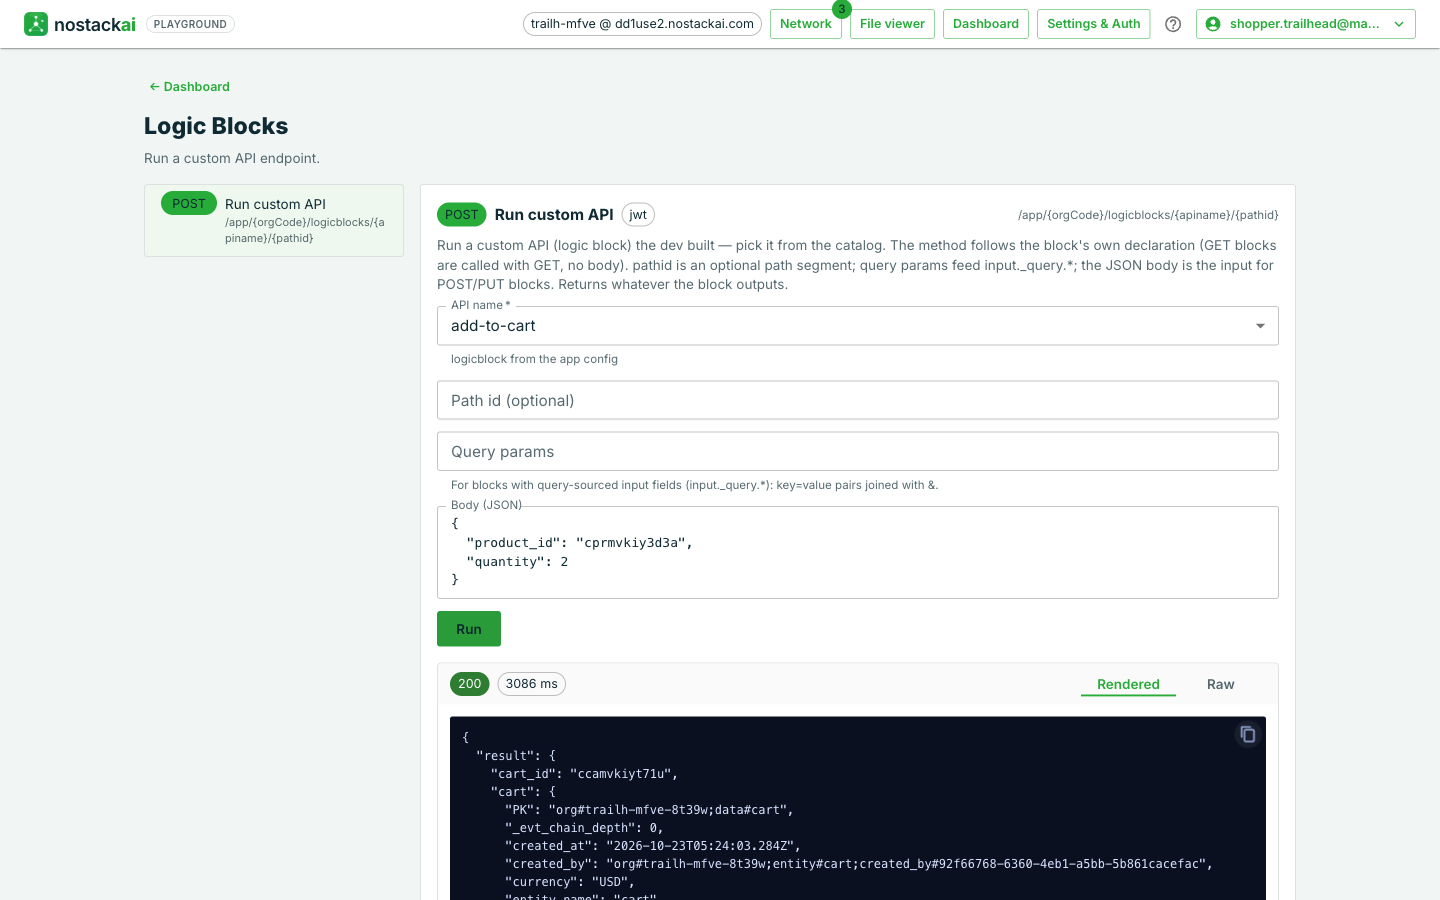
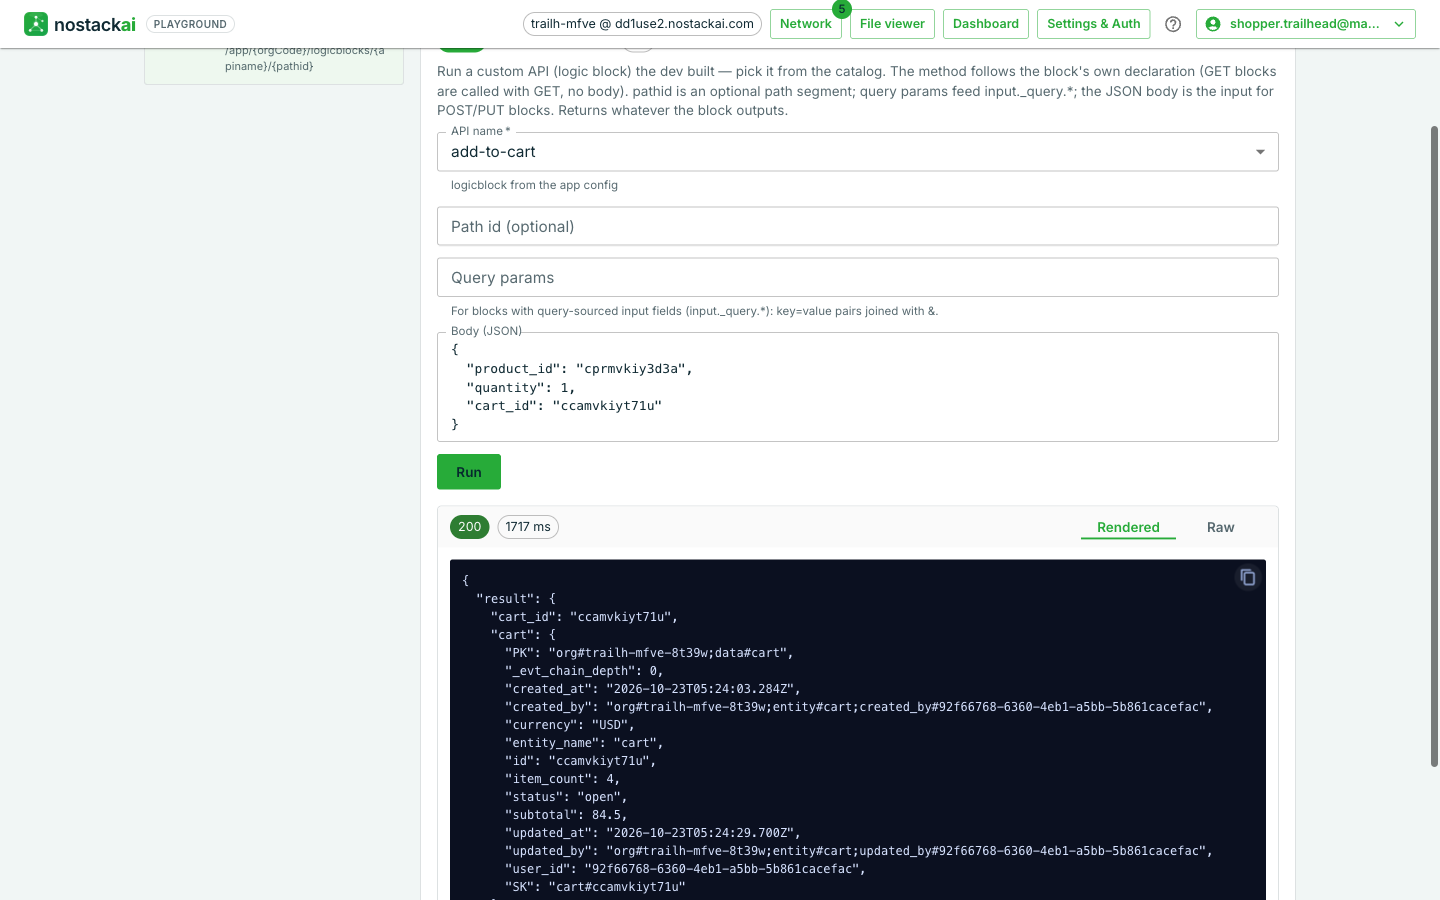
The add-to-cart Logic Block takes a product id, an optional quantity and an optional cart id. With no cart id it opens a new cart for the signed-in customer; with one it reuses that cart. It then checks whether the product is already a line of the cart: if so it raises the quantity and the line total, otherwise it adds a line with the product's current price. Last, it recomputes the cart's item count and subtotal from the lines, so they cannot drift.
Checkout, as a Glyph
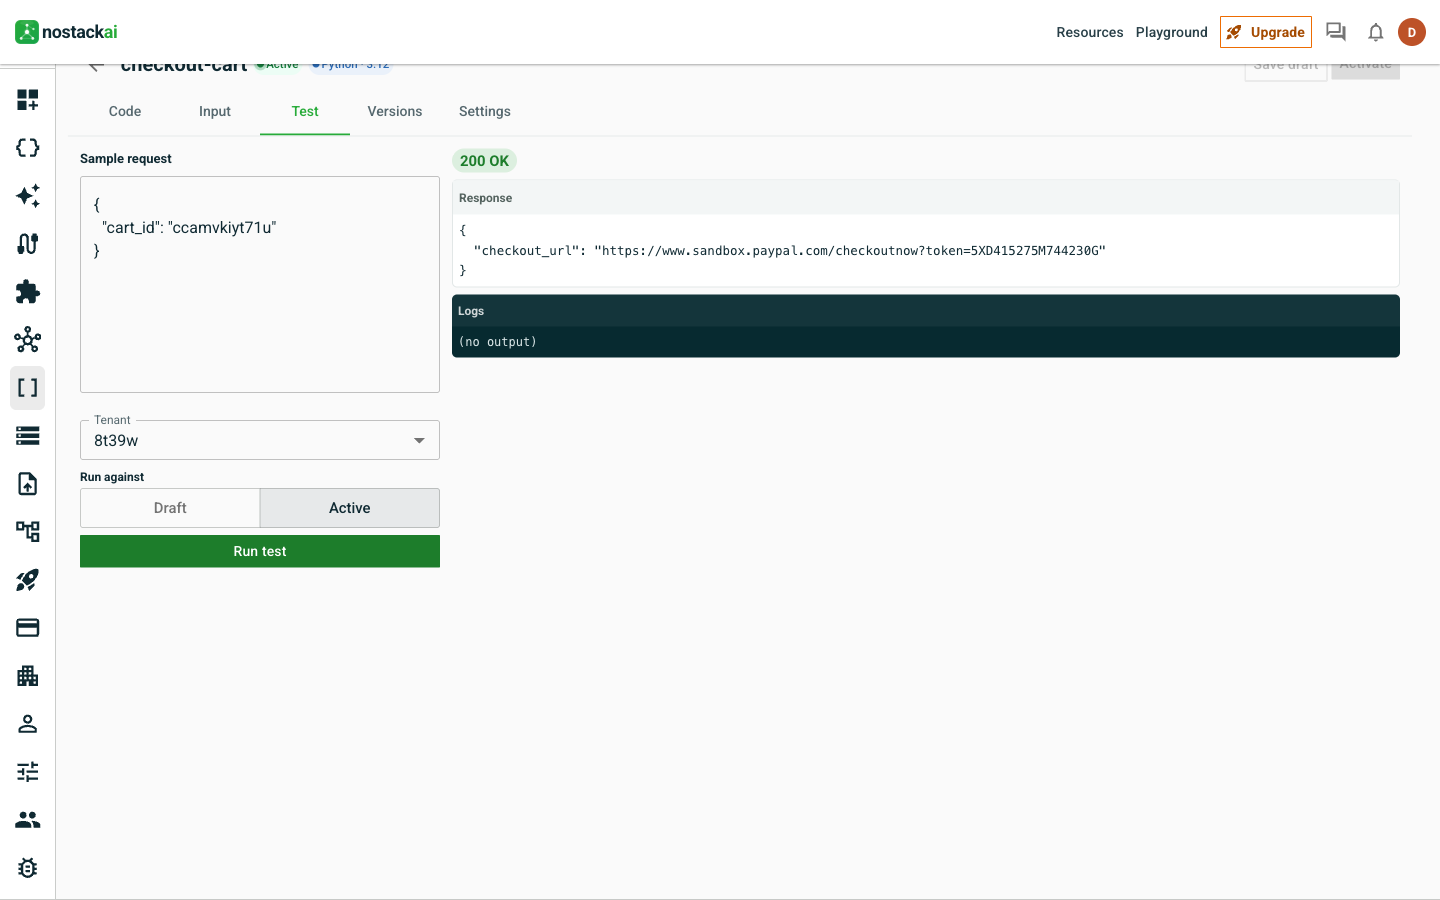
A Glyph is a small Python (or JavaScript) function you write once and run on the platform. This one is the only place the shop needs code, because PayPal wants each item as a name, a quantity and a price, and a Glyph builds that from the cart's lines in a few lines. It reads the cart, builds the items, adds up the total itself, starts the PayPal checkout, marks the cart as checkout started and returns the link.
To add it: in the console open Glyphs → New Glyph, name it checkout-cart, paste the code below (also in the downloads), add one input field cart_id (string, required) on the Input tab, save and Activate.
def handler(request, ctx):
    cart = ctx.app_db.get_entity("cart", request["cart_id"])
    lines = ctx.app_db.list_entities("cart_line", filters=[{"field": "cart_id", "op": "eq", "value": cart["id"]}],
                                  sort_by="created_at")["items"]
    items = [{"name": l["title"], "quantity": str(int(l["quantity"])),
              "unit_amount": {"currency_code": cart["currency"], "value": f"{float(l['unit_price']):.2f}"}} for l in lines]
    total = sum(int(i["quantity"]) * float(i["unit_amount"]["value"]) for i in items)
    out = ctx.connector.invoke("paypal", "checkout_cart",
                               {"line_items": items, "currency_code": cart["currency"], "total": f"{total:.2f}"},
                               entity_ref=cart["id"])
    ctx.app_db.update_entity("cart", cart["id"], {"status": "checkout_started"})
    return {"checkout_url": out["result"]["checkout_url"]}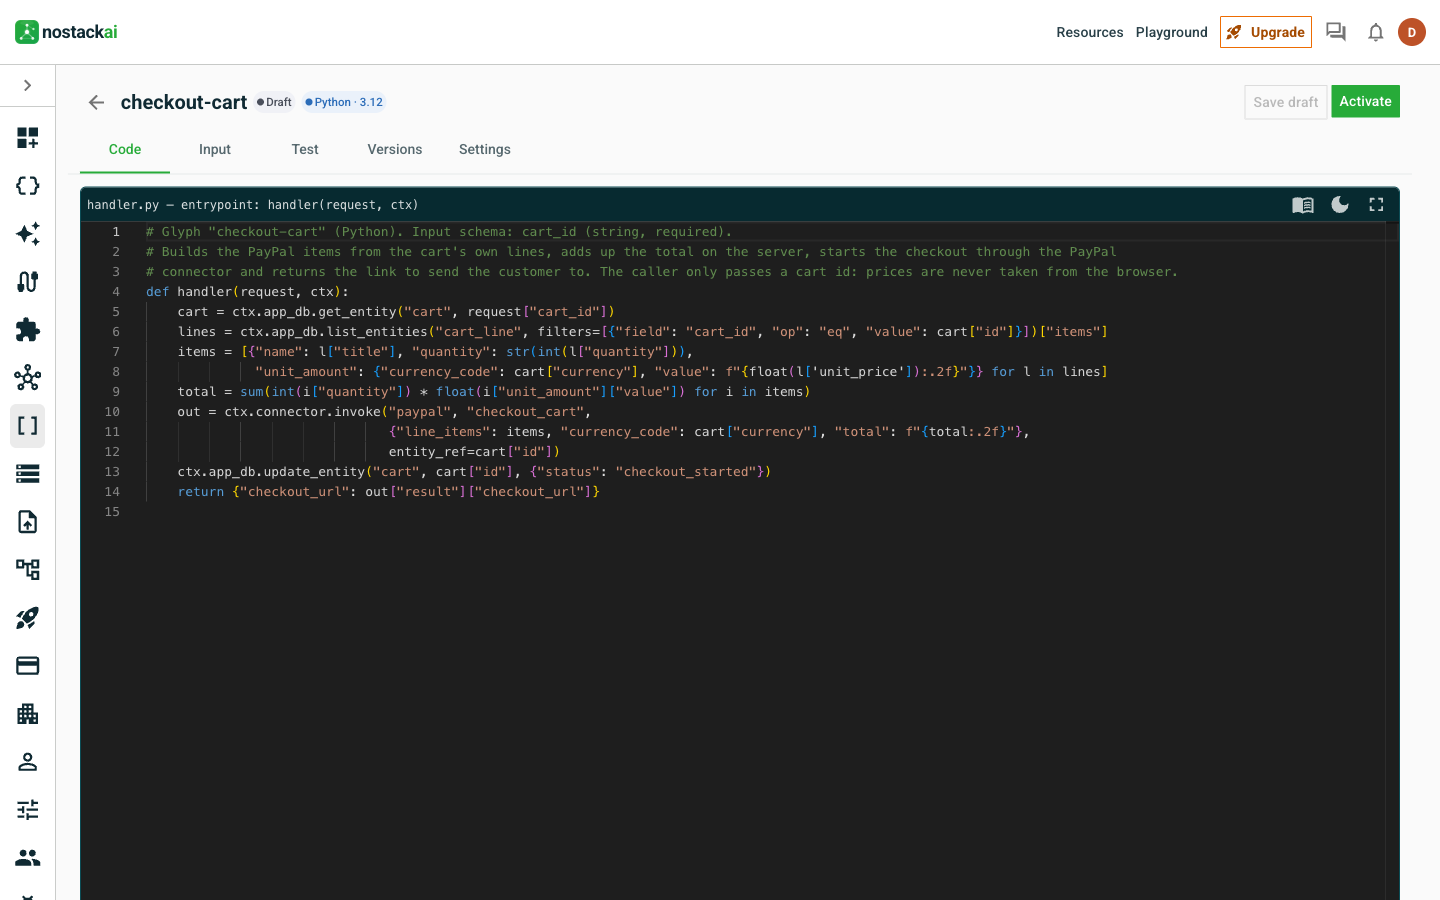
Why the cart id is the only input
The caller never sends prices. The Glyph reads them from your own records, so a customer cannot change what they are charged. The cart id is also passed to PayPal as the order's reference (entity_ref), and PayPal sends it back on every webhook: that is how the later events find this cart.
Capture
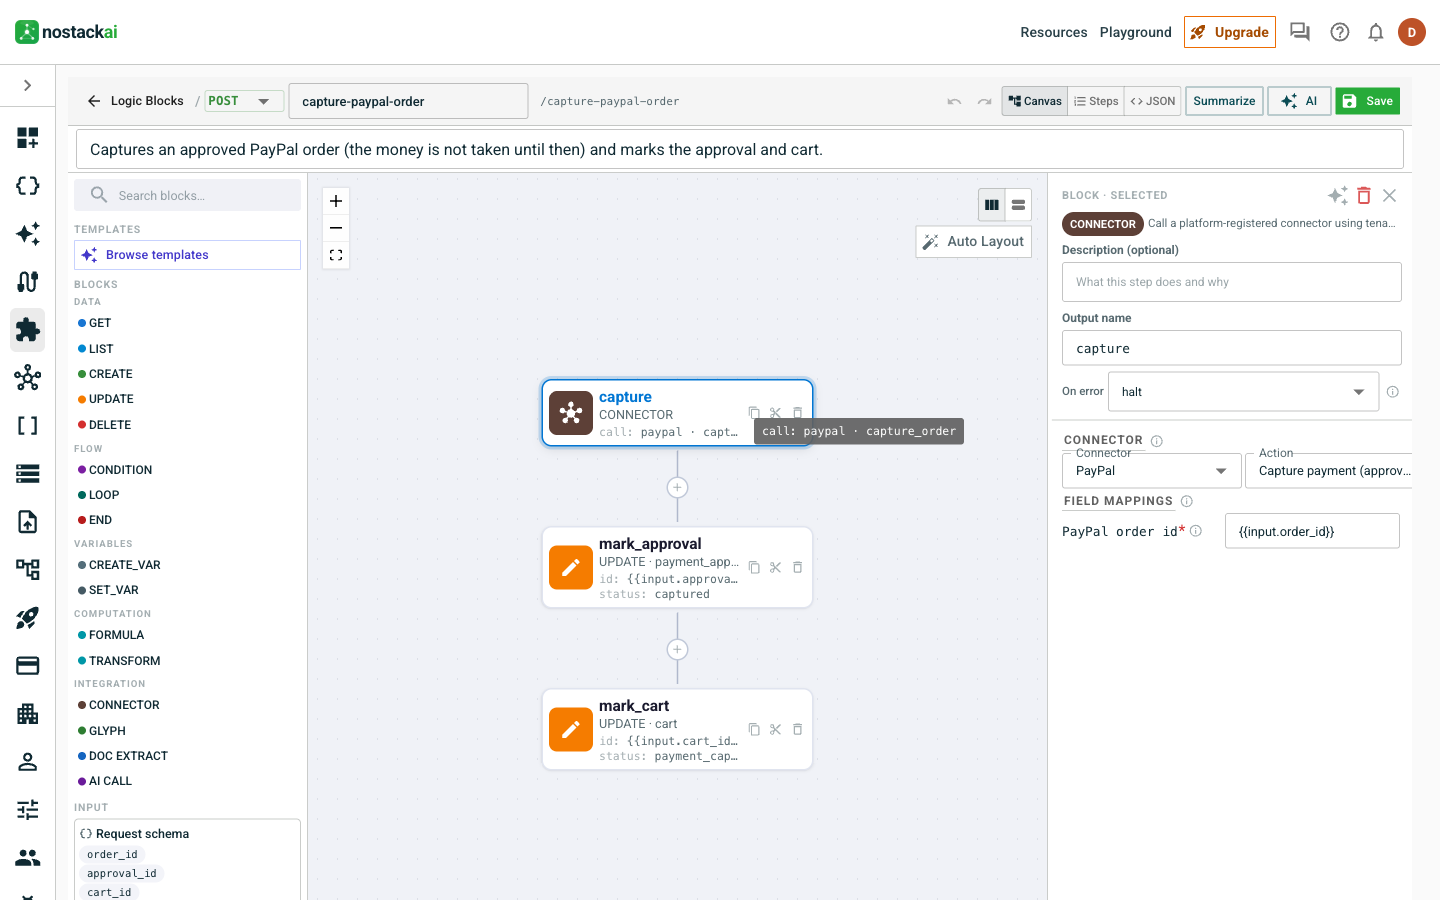
A one-time PayPal order is only *approved* when the customer returns from PayPal. No money has moved. The capture is the step that takes the payment. The capture-paypal-order Logic Block is one connector step (PayPal, *Capture payment*, with the order id) followed by two updates that mark the approval and the cart. An automation runs it the moment PayPal's approval arrives.
Order items
When PayPal reports the capture complete, a paid shop_order record is created (next section). The create-order-items automation then runs the Logic Block of the same name: it loads the order, lists the cart's lines, creates one shop_order_item for each, stores the item count on the order and marks the cart *ordered*.
How the webhooks land
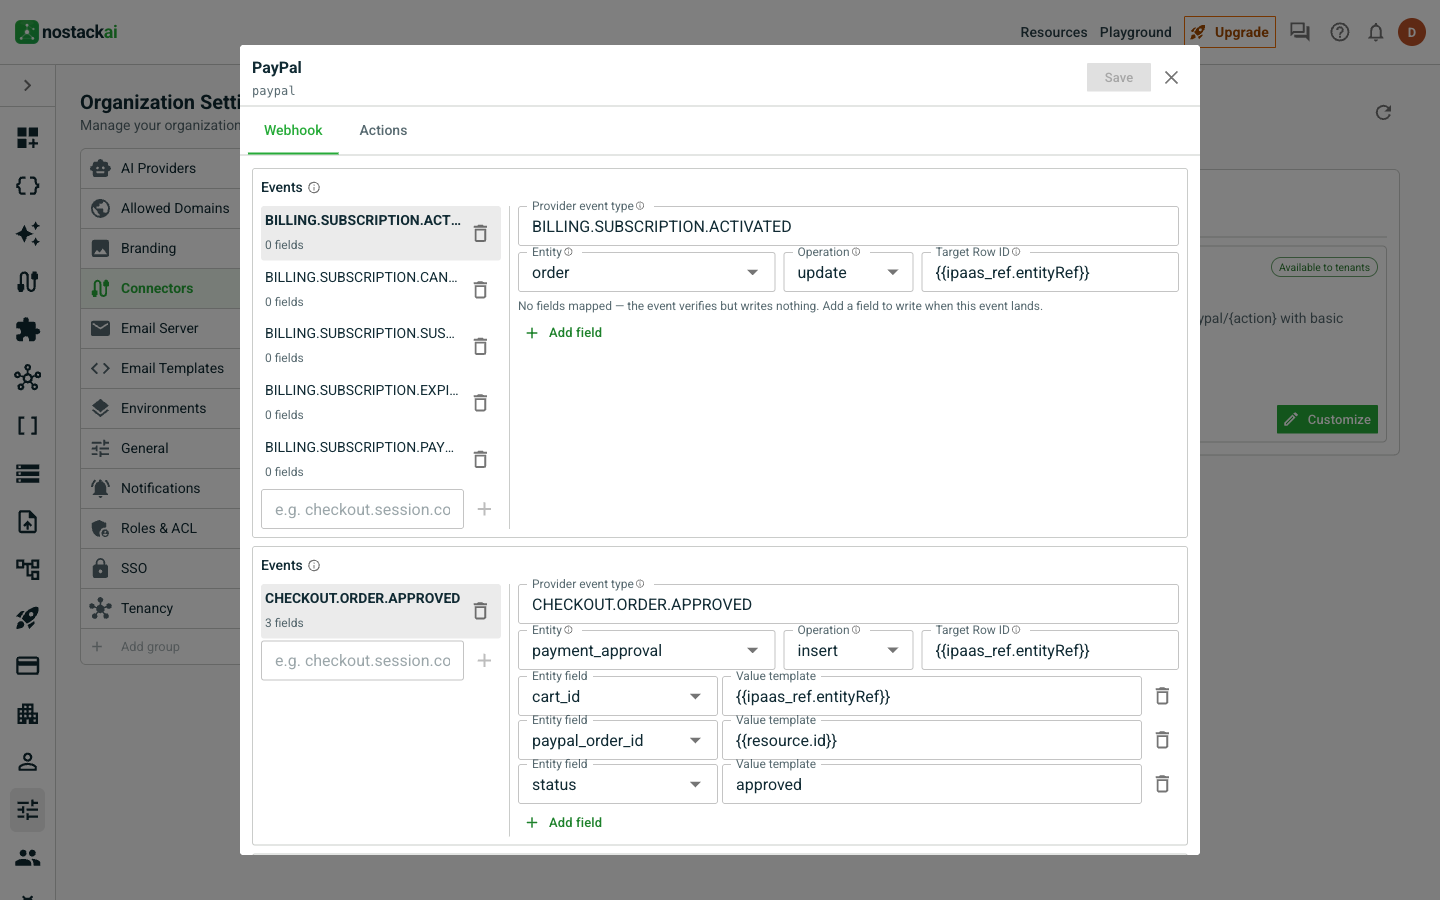
PayPal sends signed webhooks to the tenant's webhook URL. nostackai verifies the signature, finds the tenant and the original cart from the reference you passed at checkout, ignores a repeated delivery, and then applies your webhook landing: a short map from each event to the record it creates or updates.
| PayPal event | What it means | What your shop does |
|---|---|---|
| CHECKOUT.ORDER.APPROVED | The customer approved the payment on PayPal | Create a payment_approval record (cart id, PayPal order id, status approved). Its creation starts the capture. |
| PAYMENT.CAPTURE.COMPLETED | The money was taken | Create a shop_order (paid, amount, currency, payment id, paid time). Its creation starts create-order-items. |
| PAYMENT.CAPTURE.DENIED | The capture failed | Set the cart's status to payment_failed |
You set the landing under Org Settings → Connectors → PayPal → Customize → Webhook. For each event choose the record, whether to create or update it, and the value of each field. The values are templates: {{ipaas_ref.entityRef}} is the cart id you passed at checkout, and {{resource.…}} reads PayPal's own payload.
The same landing as a file, if you prefer to apply it with the MCP tool: [webhook-landing.json](/casestudies/ecommerce/webhook-landing.json).
Approved is not paid
Treat PAYMENT.CAPTURE.COMPLETED as the moment an order is paid, never the approval. The approval is only a sign that the customer said yes.
Part D · Test it in the Playground
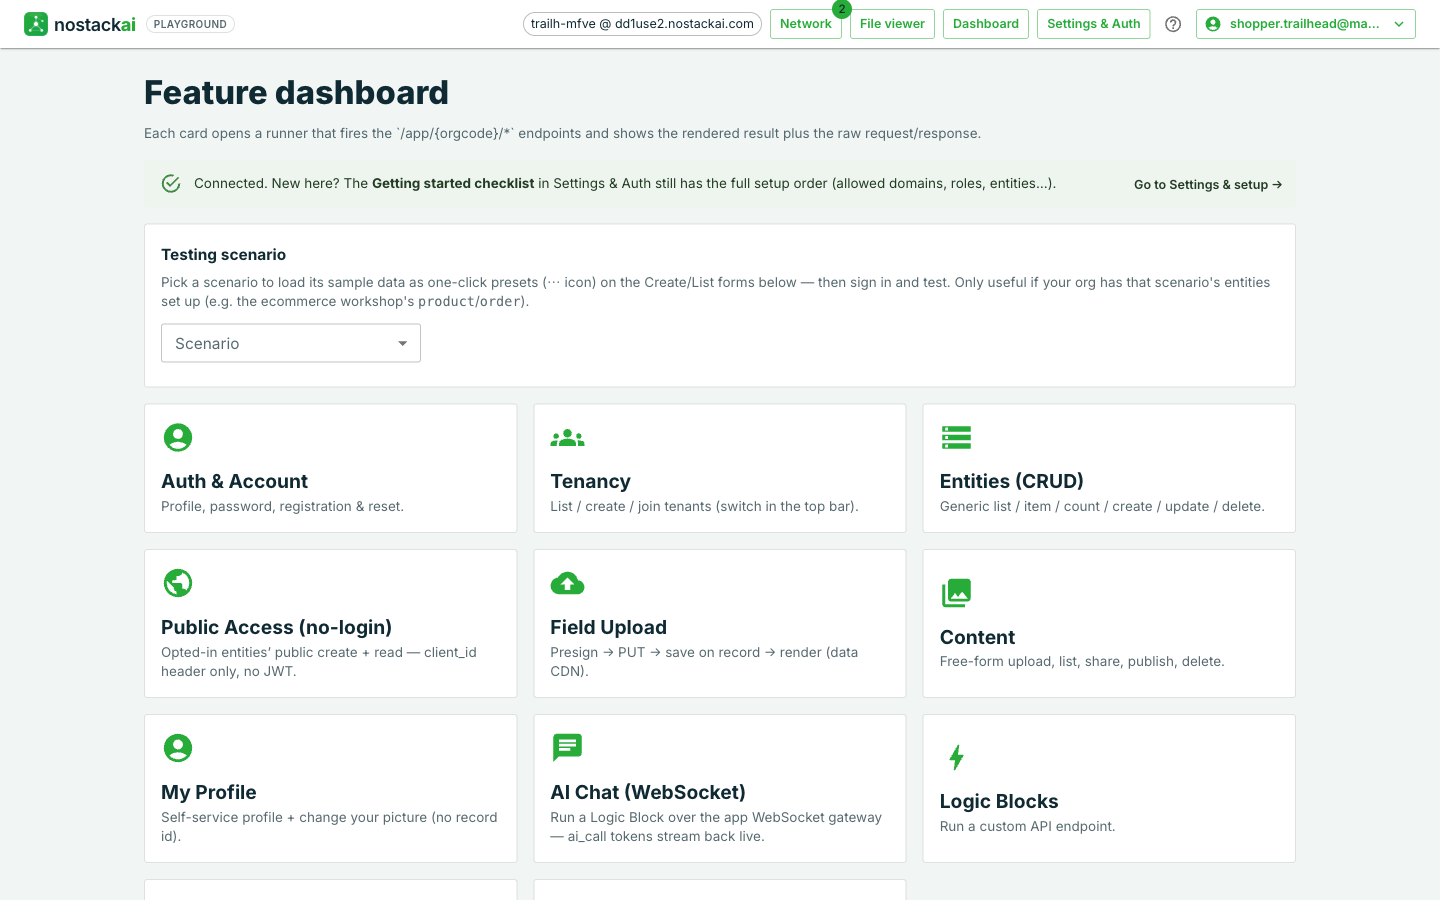
The Playground is a test client for your organization's own APIs. Everything below is what a storefront would call, run by hand. Sign in as an app user: this is a shopper, not the org admin. Register one on the Auth & Account card, then give the user the *memberacl* policy under Tenant Management → App Users → ACL so they can create records and run Logic Blocks. Point the Playground at your organization in Settings & Auth.
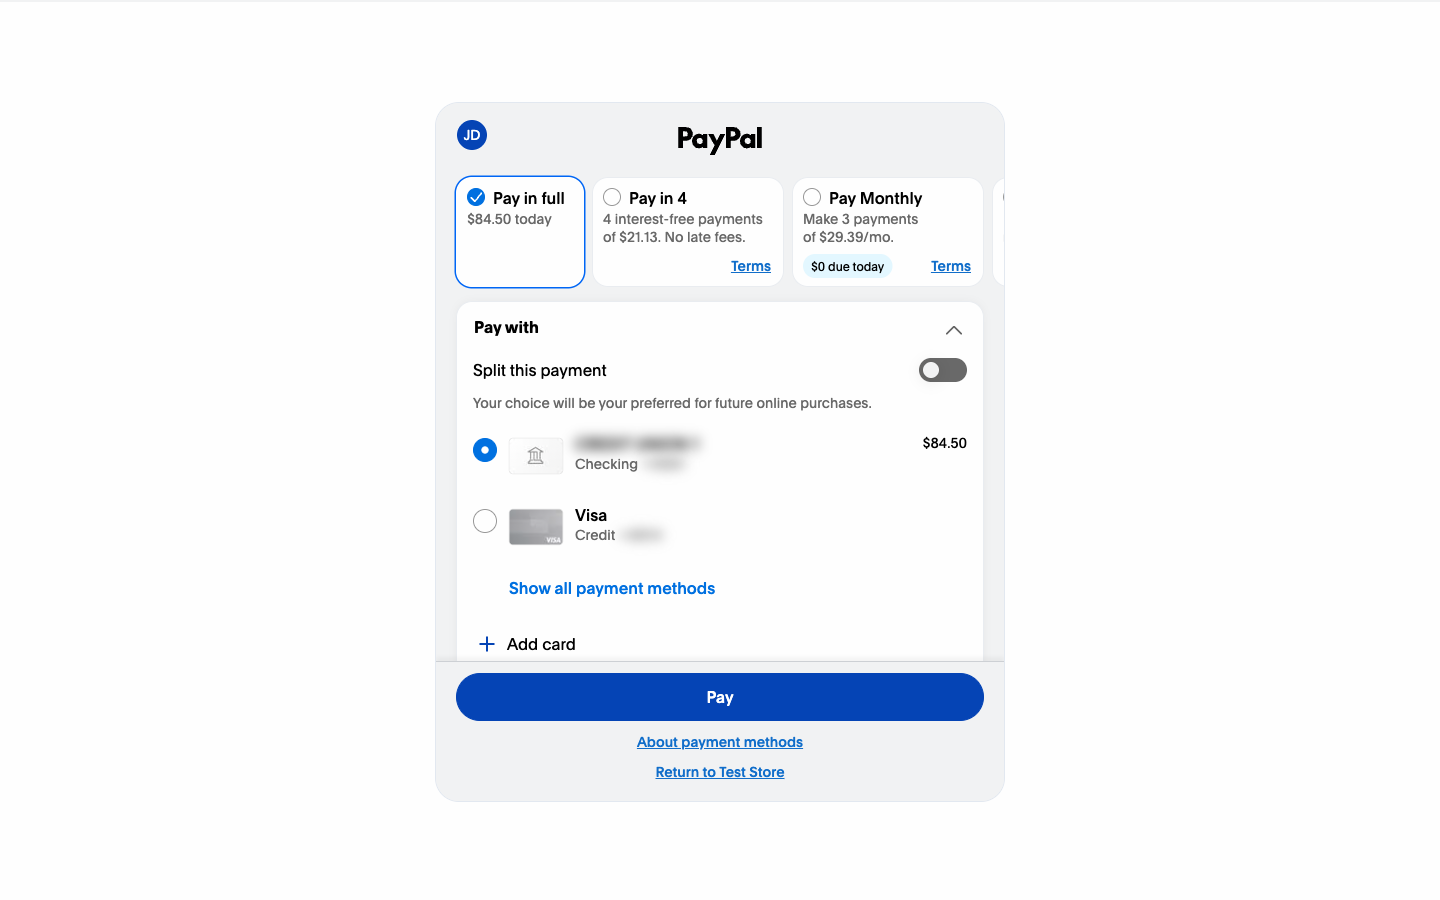
cart_id.{ "cart_id": "…" } against the active version and run it. A PayPal link comes back.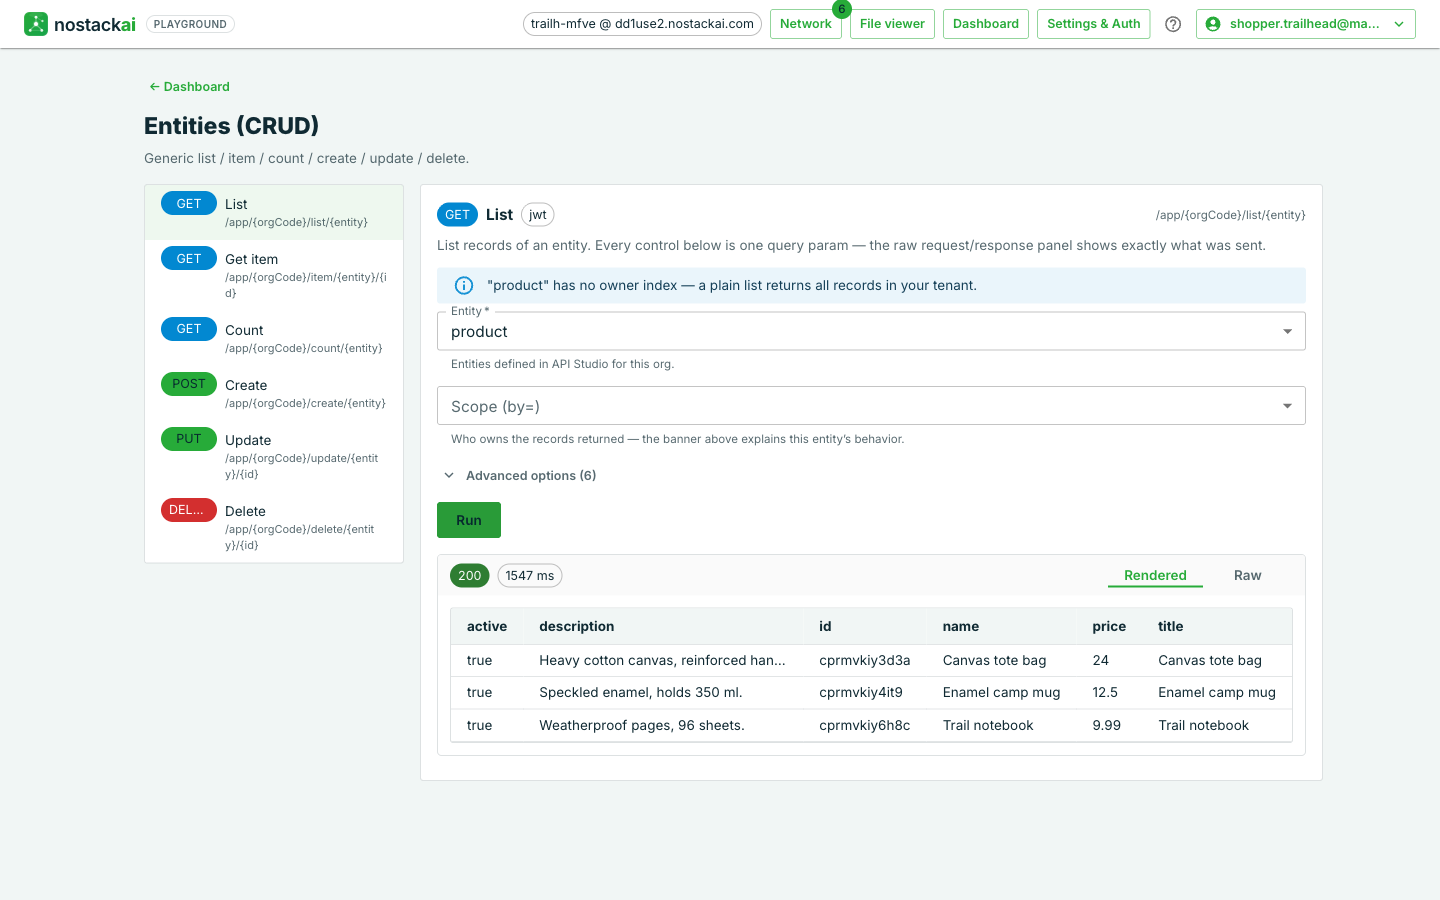
What you should see
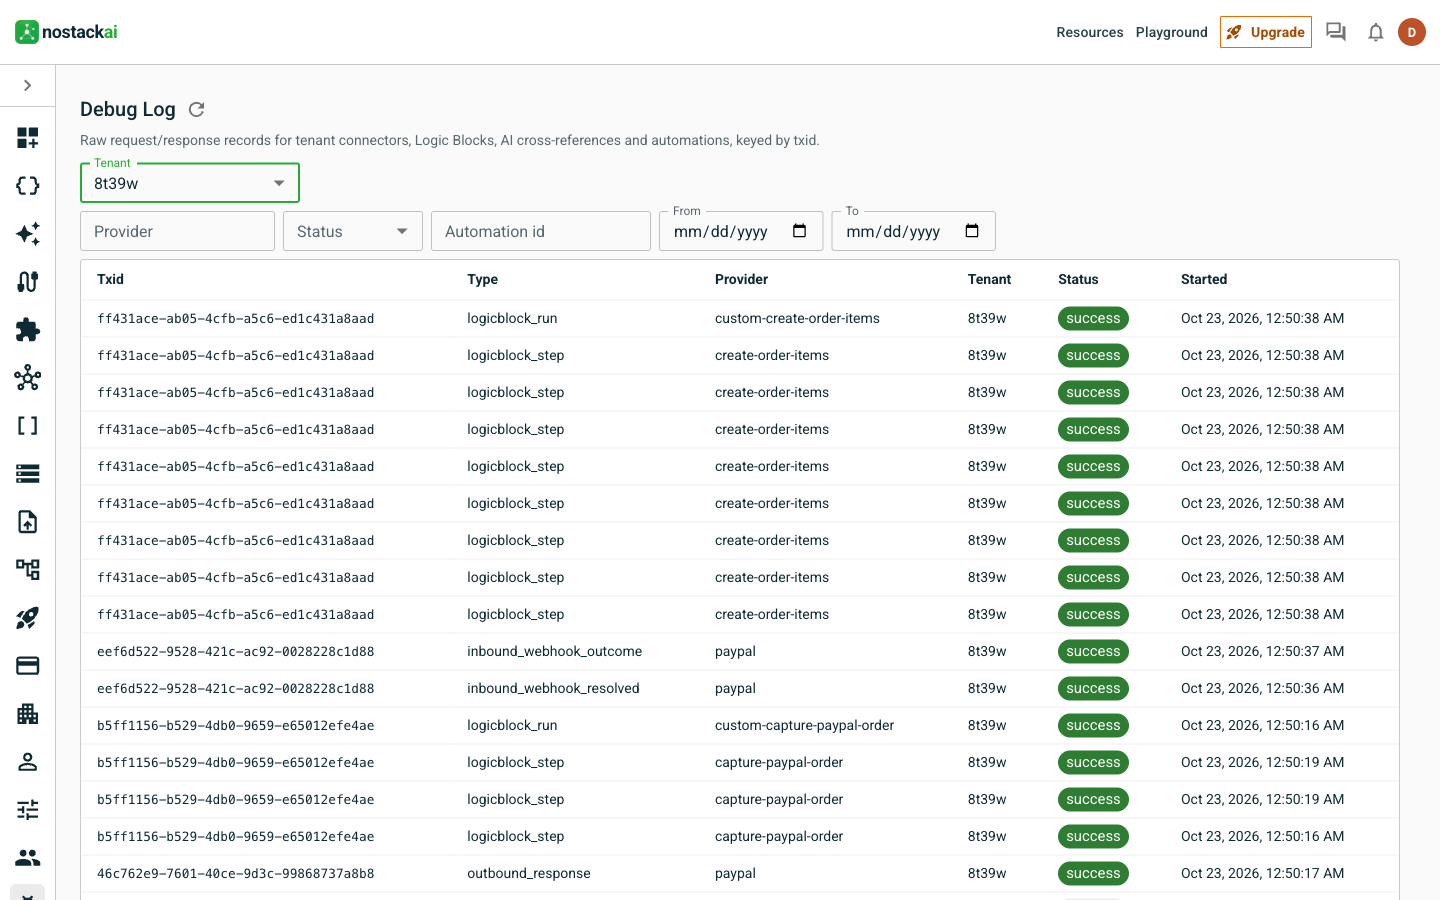
Within a few seconds of approving, three things have happened without anyone clicking anything: PayPal told nostackai the order was approved, the capture ran, and PayPal told nostackai the money was taken. The Debug Log shows each step.
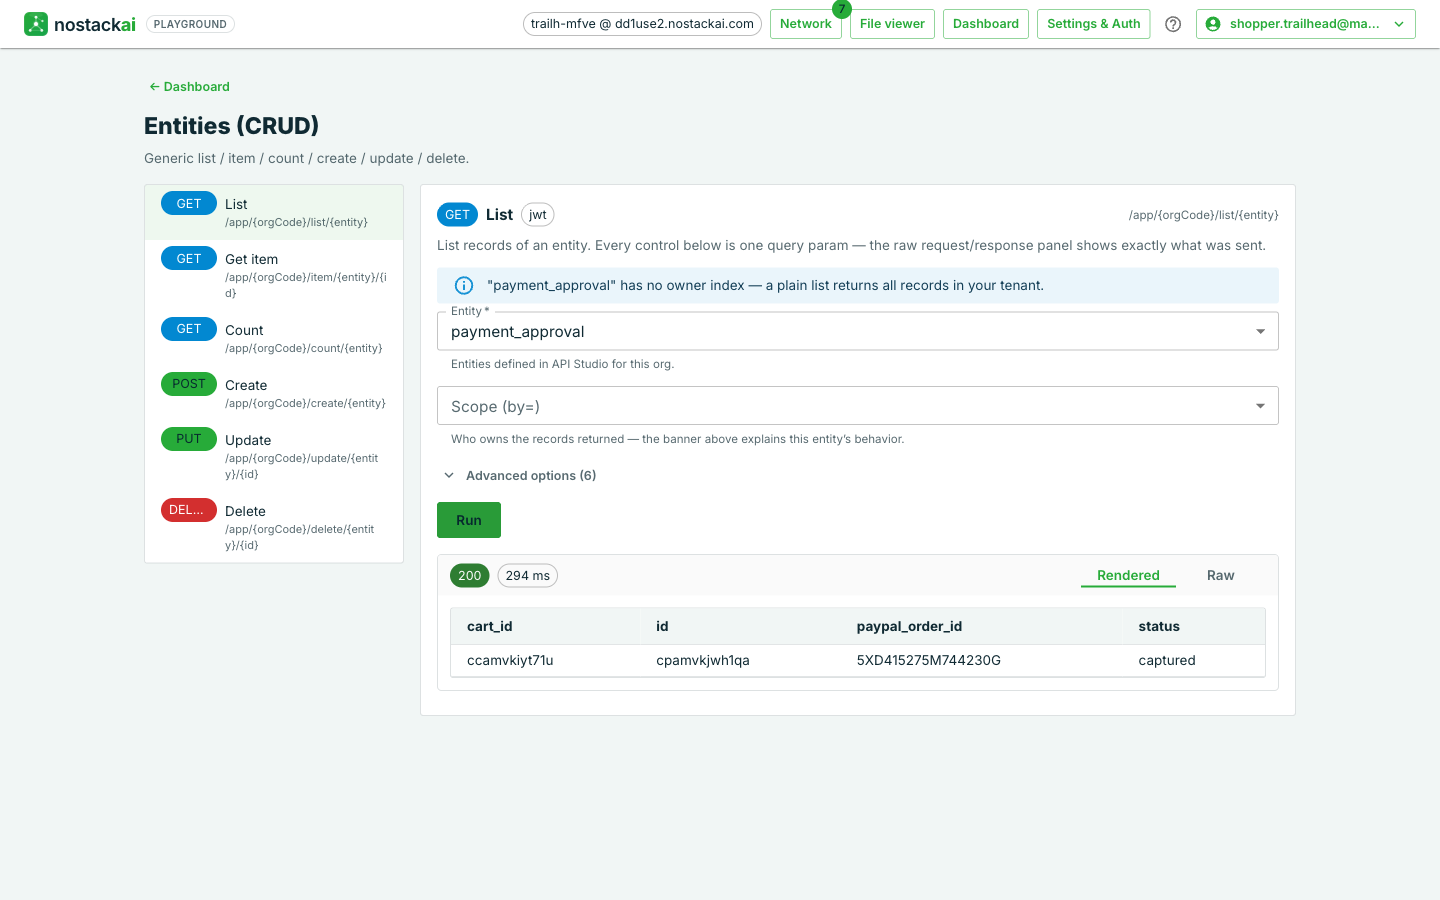
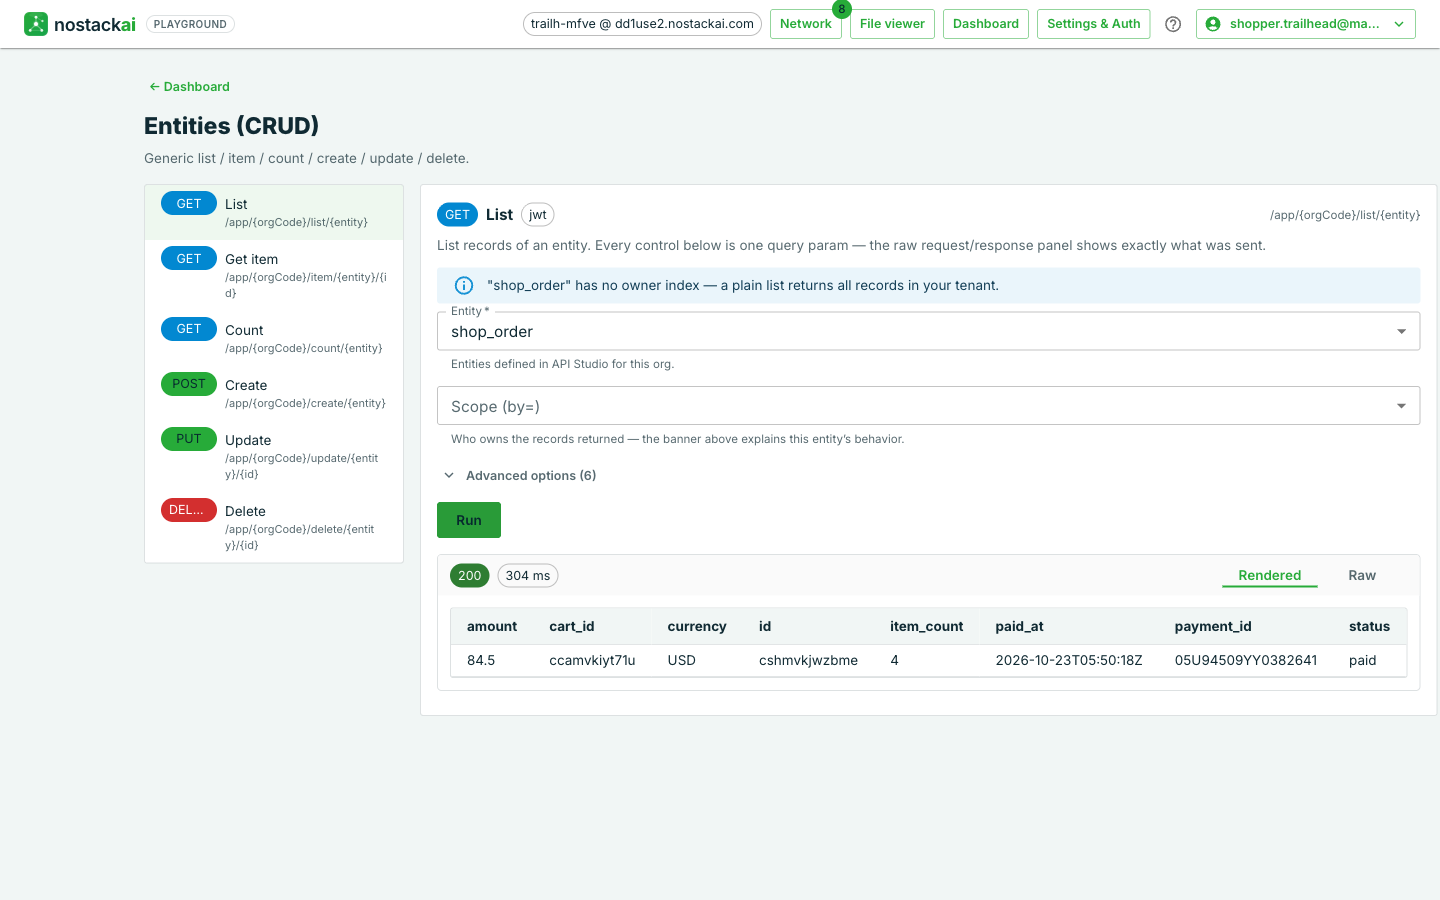
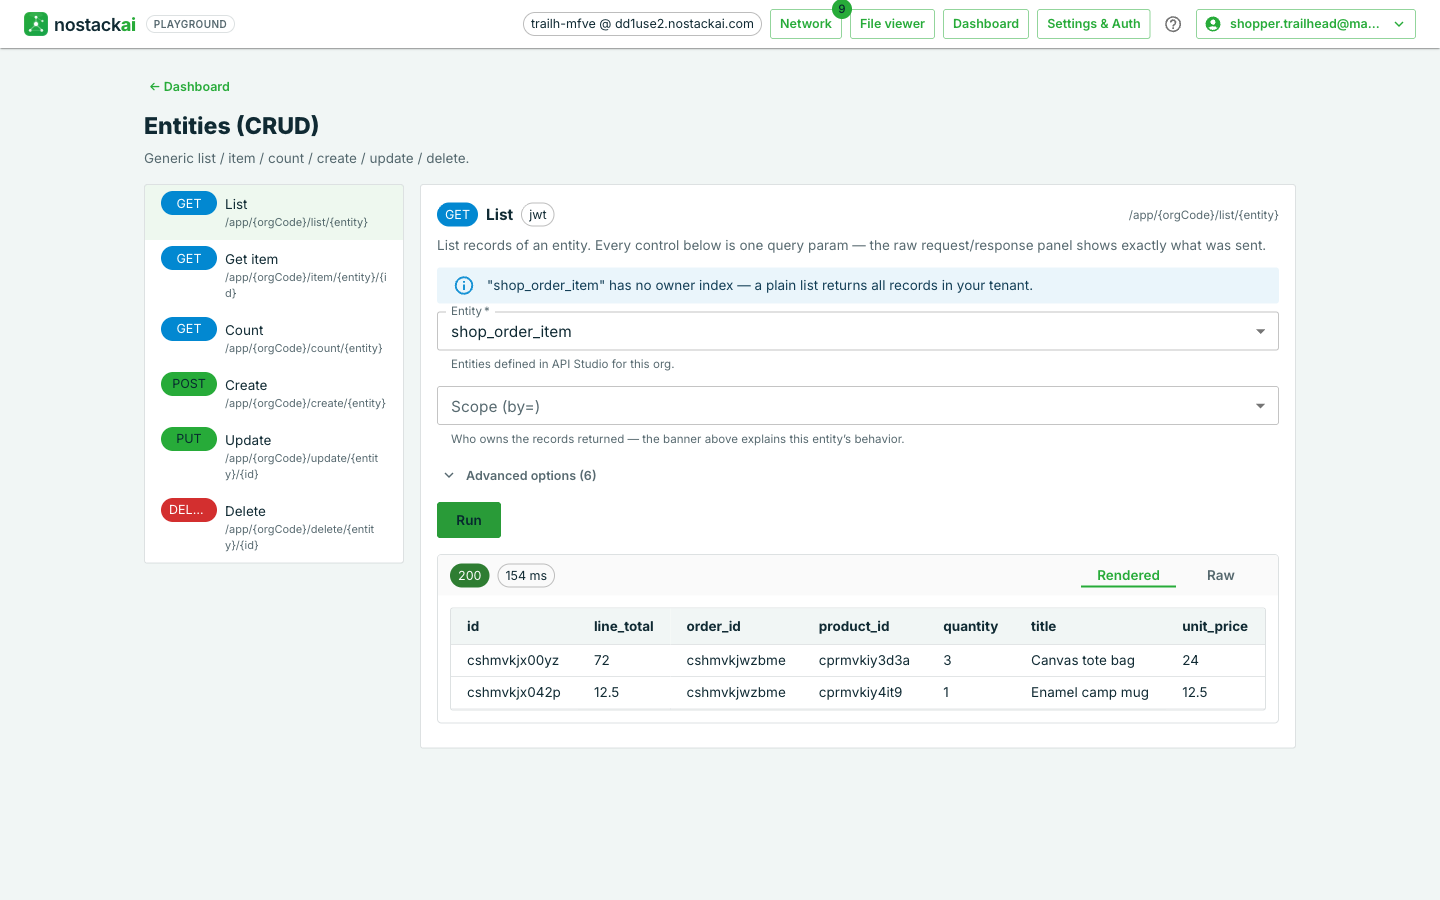
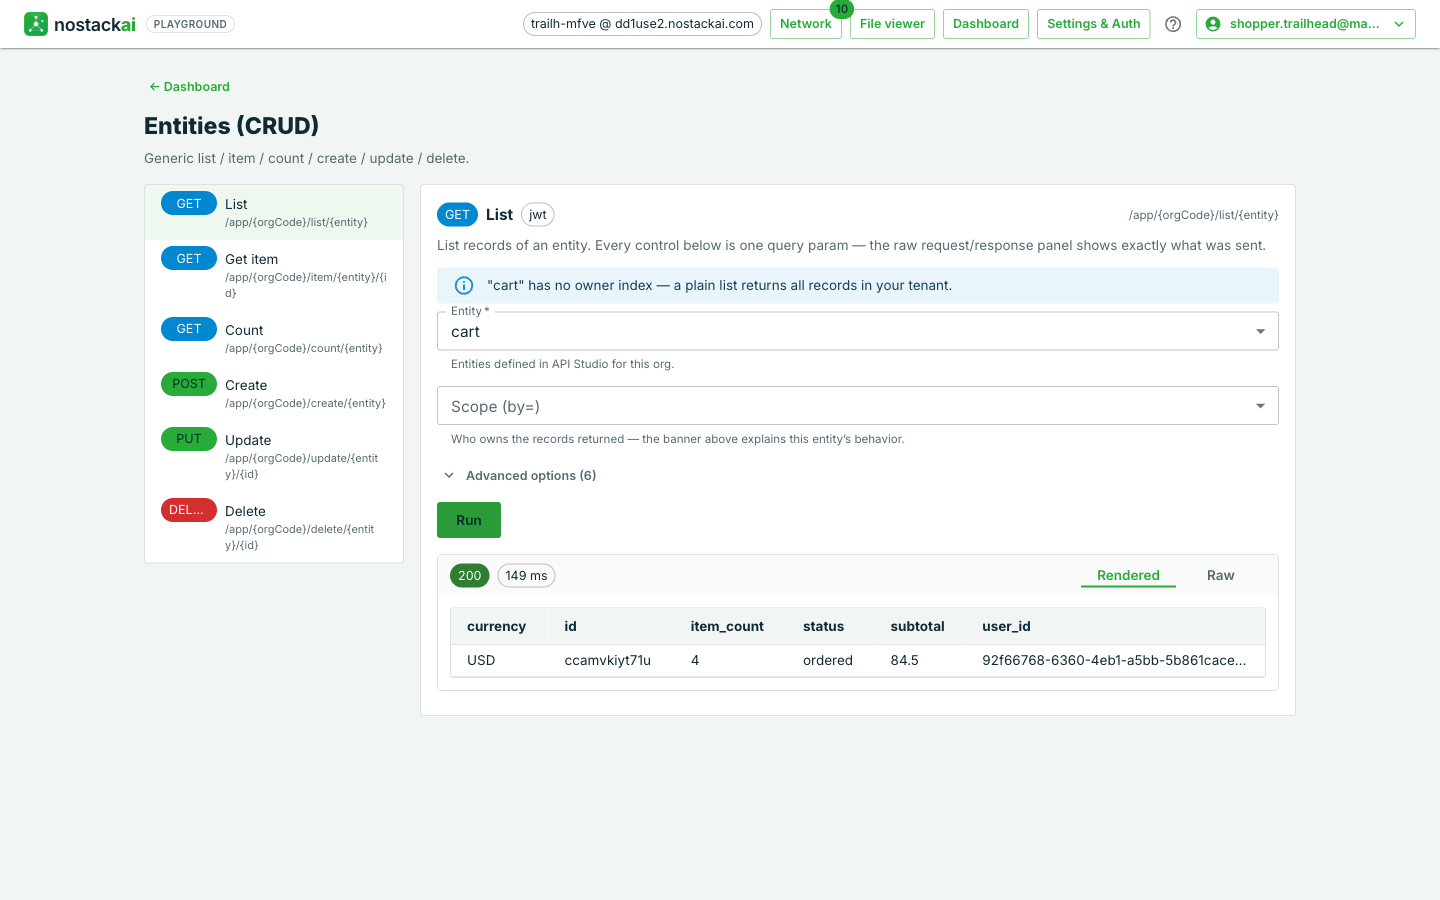
That is the whole loop: a cart, one payment, a paid order, its items and a closed cart, from six records, three Logic Blocks, two automations and ten lines of code.
Going to production
- Live credentials. Switch the tenant's environment to *Live*, enter the Live app's credentials, and register a second webhook in PayPal's live dashboard with the same events. The Webhook ID is different for each.
- Prices stay on the server. Keep the checkout reading prices from your own cart. If a browser can send prices, a browser can lower them.
- Retries. PayPal may deliver a webhook more than once. nostackai ignores a repeated delivery, so an order is not created twice; keep your own automations safe to run again too.
- Roles. The shopper here has the standard member role. Give customers only the access they need, and keep org-admin tools away from them.
- Not in this study. Refunds, shipping and tax lines, stock levels, discount codes, and subscriptions. Subscriptions use PayPal's
checkoutaction with a plan, not a cart; see Payment connectors.
Adapting it to another provider
The shop is built from the same pieces whichever provider takes the money: a connector, a webhook landing and the same records. What changes is the checkout call and the event that means paid. E-commerce assets reference lists, for Stripe, Paddle and Dodo, the action to call, the events to land and whether a separate capture step exists (PayPal needs one; the others complete the payment at checkout).
What to take from this
- It is configuration first. The connector, the landing and the automations are settings; the one piece of code is the part that is naturally code.
- Your records stay yours. The cart, the order and the items are ordinary entities you can query, extend and report on.
- Webhooks drive the shop. Nothing polls PayPal. A verified event creates a record, and a record creates the next step.
- You can test every step by hand. Each asset runs on its own in the Playground or the console before they work together.
E-commerce assets reference
Field tables, the Logic Block and landing definitions, other providers, troubleshooting.
Payment connectors
Setting up PayPal, Stripe, Paddle and Dodo for your tenant.
The connector step
Calling any connector from a Logic Block.
The Glyph SDK
Everything a Glyph can do: entities, connectors, the signed-in user.